Thursday, June 21, 2012

Trader Joe's Loot and Sauteed Bok Choy and Broccoli

Trader Joe's loot

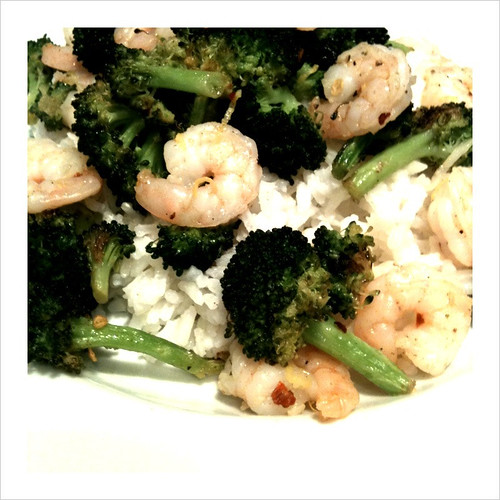
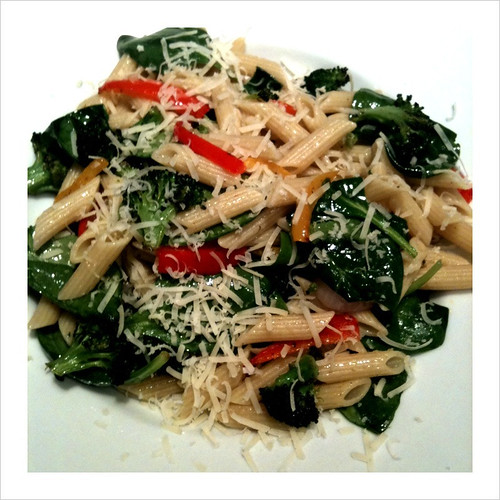
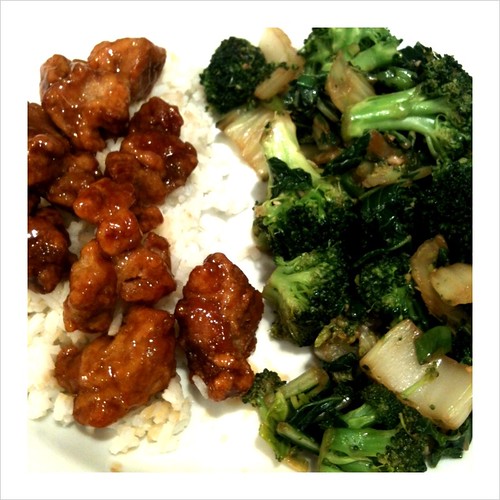
Our opening day visit to the first Trader Joe's in Texas was exciting and crazy! After trying to wind our way through the aisles that were lined with people cued up to check out, I stuck Mom in a line and then made repeated trips around the store to grab stuff and bring it back and put in the basket. This was the best plan we could have come up with. We made it in and out in about an hour. We were even lucky enough to get a parking spot in their tiny lot. People were parking blocks away! I was able to get about half the items I had on my list, and considering I had to ask people to part like the Red Sea in order to pluck items from the shelf, I called it a success. Of course one of the things I just had to grab was the infamous Mandarin Orange Chicken. And then I had to come up with something to have on the side. That's where the rest of the post title comes in.

I've been wanting to try bok choy lately. I know, let's not discuss how long the list of veggies I haven't tried is, okay. Just know that I'm working on it. Anyway, I came across this Martha Stewart recipe and it seemed like the perfect thing. Josh loves soy sauce and broccoli, so I knew that he would like it. I omitted the ginger from the recipe, partly out of laziness, and partly....okay it was all laziness. Other than that everything went into the skillet and out came a great compliment to the chicken. And of course, TJ's Orange Chicken got two big thumbs up from us. I love that there are two sauce pouches in the bag. For a household of two, that let's us get two meals out of one bag. I also made up a quick batch of rice. Wanted it to be brown rice, then realized I barely had any in the pantry. Oh well!

Sauteed Bok Choy and Broccoli
Recipe from Martha Stewart; Serves 4
Sautéed Broccoli & Bok Choy w/ Mandarin Orange Chicken

1 pound bok choy
1 pound broccoli
2 tablespoons vegetable oil, such as safflower
1 garlic clove, chopped
1 tablespoon finely grated fresh ginger
1 to 2 tablespoons soy sauce
  • Cut white stalks from bok choy; slice into 1-inch pieces. Coarsely chop green leaves.
  • Peel stalks from broccoli; slice 1/4 inch thick. Cut florets into bite-size pieces.
  • In a large skillet, boil 1/2 cup water. Add bok choy stalks and broccoli; cover. Simmer over medium-low until broccoli is bright green, 5 to 7 minutes. Uncover; cook on high until water evaporates, 2 to 4 minutes.
  • Add bok choy leaves, oil, and garlic. Cook, tossing often, until garlic is fragrant, 2 minutes.
  • Press ginger in a sieve over skillet to release juices. Stir in soy sauce. 
My notes: Unrelated to this recipe, but do yourself a favor and buy some Falafel Chips. They are the new love of our household!

Wednesday, June 06, 2012

Trader Joe's Prepwork

I'm not gonna bother to do another "I'm back" post here. These days I just have to come and go as I please, and the going is lasting longer and longer. I'm cooking, I just don't have the time and energy to photograph, edit the photos, and write the blog posts.

However, I figured I had an important duty to my fellow Fort Worth friends. In just 9 short days our very first, very own Trader Joe's will be opening. As a long time food blog reader I have long been envious when I would see them using fantastic TJ products that I just couldn't get my hands on. I would read wonderful reviews of frozen goodies, cookies, marinades, and sauces, and all I could do was longingly sigh. Well, soon we sigh no more fellow Cowtown residents!

The past few weeks I've been spending some of my excessive online time looking around for Trader Joe's product recommendations. I thought I'd share some of what I've discovered here so we're not all blindly wandering into our new TJ's without at least a few items to keep our peepers peeled for.

First off, here are a couple of great lists of favorite Trader Joe products from a few trusted food bloggers:

Be sure to check the comments on those pages, because readers shared their favorites there as well. So, what am I going to be looking to check off my list on my inaugural TJ shopping trip? Here are a few things I'm hoping our new Trader Joe's will have in stock when they open their doors.
  • Frozen breaded eggplant patties
  • Packaged pre-cut Kale
  • Frozen Indian meals for Josh
  • Greek olive goat cheese
  • Frozen croissants and chocolate croissants
  • Jalapeno hummus
  • "Two Buck Chuck" (Note: I think it's more like three bucks these days, ha)
  • Falafel Chips
  • Heat & eat falafel
  • Soy chorizo
  • Vegetable pakoras
  • Dark chocolate covered peanut butter wafers
  • Frozen potato pancakes
  • Soyaki marinade
  • Frozen mandarin orange chicken
  • Toilet paper
Yes, I said toilet paper. According to the National Resources Defense Council Trader Joe's 100% recycled toilet paper is a recommended product, and I hear the price might even be better than what I've been paying for non-recycled tissue.

I'll see you guys in aisles soon!

Saturday, January 21, 2012

I'm Baklava!

I mean, I'm back! I haven't had a much better excuse for not blogging than laziness. School and work keeps me busy. If you ever stop by my personal blog, you know that my boss died a few days after Thanksgiving. I'm still working at the office for now, while we try to wrap things up with his wife. I got a new part time job, blogging for a local furniture company (visit us over here). And, funnily enough, I've been cooking up a storm. I hosted my family for Thanksgiving this year. Pinterest has provided a plethora of recipes to try, too. So, rather than let this little space of cyberstuff that I've cobbled together over the years flitter away, I decided I better get back to sharing the bits and bobs that I've been making in the kitchen. Probably won't be all that often, but a little is better than nothing, right?

This morning I made these yummy Baklava Muffins. I found the recipe through Pinterest, but it's from one of my old blog reads, Culinary Concoctions by Peabody. I needed to use up some buttermilk I bought earlier in the week, and I had leftover chopped walnuts from a cheeseball I made for the holidays. This recipe was an ideal use for both of those ingredients. These turned out deliciously. Definitely be sure to not over mix the batter, because these come out so light with such a delicate crumb thanks to a gentle hand.

Baklava Muffins
Recipe from Nigella Lawson via Culinary Concoctions By Peabody, Makes 1 dozen
Baklava Muffin
for the filling:
1/2 cup chopped walnuts
1/3 cup sugar
1 1/2 teaspoon cinnamon
3 tablespoons melted butter

for the muffins:
1 cup plus 7 tablespoons all-purpose flour
2 teaspoon baking powder
1/2 teaspoon baking soda
1/4 cup sugar
1 large egg
3 tablespoons unsalted butter, melted
1 cup plus 2 tablespoons buttermilk

for the topping:
1/2 cup honey

  • Preheat to 400F.
  • Mix all the filling ingredients together in a small bowl, and then start the muffins. In a large bowl, mix together the flour, baking powder, baking soda, and sugar. In a wide-mouthed measuring cup, whisk the egg, melted butter, and buttermilk. Make a well in the dry ingredients, pour in the liquid, and mix lightly and gently, remembering to keep it lumpy rather then going all-out for smooth: anything more than the gentlest handling makes for a heavy muffin.
  • Fill the muffin cups 1/3 full, add scant TBSP of filling, then cover with more muffin mixture until 2/3 full. Sprinkle any remaining filling on top of the muffin
  • Bake for 15 minutes. Put the muffins, still in their paper cups, onto a rack and drizzle with honey.
My notes: I made sure to keep whisking as I slowly added the melted butter to the buttermilk and egg, and even as I slowly poured it into dry ingredients I kept the whisk moving. It helped to make sure it actually got incorporated well, instead of just clumping up in the colder milk.

Thursday, August 25, 2011

Spicy Roasted Broccoli & Shrimp

Sorry for the long blog hiatus, and I wish I could say that I'm ready to be back posting regularly, but I'm not. I will definitely try to post when I can, though. Things have been hectic this summer, and I'm sure they're about to get more busy as I start my Fall semester next week. Also, shortly after my last blog post our oven tried to burn the house down. So, I'm currently without an oven, AKA my favorite way of cooking. I can't begin to tell you how sad it is to not be able to just quickly toss some veggies in to roast. Sigh. The only upside is now I have a good excuse to get the double oven I've long desired. But it'll be awhile before I can afford the oven and before Josh's uncle, Gary, will be able to install it. Sadly, no oven also means it'll be awhile before I can make this recipe again. Josh and I both really, really liked this dish. It tasted fantastic and can we just discuss how quick it is? Especially since I used some of the ever present frozen pre-cooked shrimp I had in the freezer, and pre-cut broccoli. I just adjusted the cooking time slightly to account for not having raw shrimp. Man. I'm starting to get depressed just thinking about not being able to whip this up tonight, so I better just get to the recipe already. This is another dinner that I stumbled across on Pinterest, from Everybody Likes Sandwiches.

Spicy Roasted Broccoli & Shrimp
Recipe from Everybody Likes Sandwiches; Serves 2
Spicy Roasted Broccoli and Shrimp
2 large heads of broccoli
4 T olive oil
1/2 t ground cumin
1/2 t ground coriander
1/2 t chili flakes
1 t kosher salt
1 t black pepper
20 large raw shrimp, shelled and deveined
zest from 1 lemon + remaining lemon cut into quarters

  • Preheat oven to 425F.
  • In a large bowl combine the broccoli with 2 tablespoons of oil, cumin, coriander, 1/4 teaspoon of chili flakes, 1/2 teaspoon salt and 1/2 teaspoon pepper. In another bowl, mix together the shrimp with the remaining chili flakes, salt and pepper, olive oil and all the lemon zest.
  • Add the broccoli onto a prepared cookie sheet, lined with either parchment paper, in one layer and roast for 10 minutes. Add the shrimp and cook for 10 minutes more – tossing once at the midway mark. When the broccoli is golden and crispy and the shrimp is opaque, remove from oven. Serve over rice and squeeze with lemon juice.
I used one bag of the pre-cut broccoli and 2 servings, per the bag's measurements, of pre-cooked shrimp. Instead of putting the shrimp in for 10 minutes I added them after the last tossing, so they cooked for 5. At 425 degrees, that was plenty to warm them through. So delicious and so quick!

Wednesday, July 06, 2011

Peanut-Banana Espresso Smoothie

This week I'm back with another recipe I discovered via Pinterest. This is a smoothie from Martha Stewart that had somehow escaped my notice until we crossed paths on Pinterest. I gave it a shot one weekend morning when Josh was out of town. I didn't want to make coffee for one, but I definitely still needed to get a caffeine wake-up call. I thought this might be just the time to try this espresso laced sip. I whipped up a half-batch in my blender, as this recipe serves 2 and as I mentioned I was sipping solo that morning. This is certainly not low on calories, what with the peanut butter, but with the addition of the banana and milk it's full of protein that kept me full and gave me plenty of energy. I used soy milk for my version, since that's what we keep around the house. I figure after that substitution that this hits the mark around 280 calories, which is just under my typical breakfast count so not too shabby on the whole. The espresso definitely provided the perk I was looking for. And on top of everything I've gone on and on about- it tastes great! The combined smooth and creamy flavors of banana, peanut butter, and the rich, almost chocolatey espresso are delicious together. This is a great alternative to the typical fruity-sweet smoothies, and can step in for your coffee and your cereal all in one!

Peanut-Banana Espresso Smoothie
Adapted from Martha Stewart; Recipe serves 2
Peanut-Banana Espresso Smoothie

1 cup plain soy milk
1 tablespoon instant espresso powder
1/4 cup natural creamy peanut butter
1 ripe banana, cut into thirds
1 cup ice
  • Blend soy milk, espresso powder, peanut butter, banana, and ice. Enjoy!

Friday, July 01, 2011

Quinoa Stuffed Peppers

I've been shopping at a newer store in the area, Sprouts. They have great produce prices and since we started shopping there I've been trying to make the most of it. One of my favorite items were the bright, colorful bell peppers. I've gotten them for as little as 50 cents, so why wouldn't I go in search for more recipes to use this great, healthy resource? Of course, the first thing I thought of was Stuffed Peppers, but I wasn't interested in the typical sausage/meat filling. I turned to Deborah Madison's Vegetarian Suppers and found just what I was looking for. This recipe turned out.... pretty good. I actually ended up not enjoying the pepper part that much. The filling however, it was fabulous. I'm definitely going to make the filling again. It'd make for a great grain-salad dinner. I'm craving it now just thinking about it.

Quinoa Stuffed Peppers
Recipe from Deborah Madison; Serves 4
Stuffed Peppers
Sea salt and freshly ground pepper to taste
1 cup quinoa, rinsed well several times
3 tablespoons olive oil
1 bunch of scallions, including 2 inches of the greens, thinly sliced into rounds
2 jalapeño chiles, finely diced, seeded if desired
1 garlic clove, peeled and finely chopped
1 teaspoon ground cumin
2 cups, more or less, fresh or frozen corn kernels (from 3 ears corn)
1 bunch of spinach, leaves only, or 1/2 pound spinach leaves
1/2 cup chopped cilantro
1/4 pound feta cheese, cut into small cubes
2 large red onions, peeled and thinly sliced into rounds
1/2 cup Riesling or other aromatic white wine
4 yellow and/or orange bell peppers

  • Bring 2 cups of water to a boil. Add 1/2 teaspoon salt, then the quinoa. Give it a stir, then cover and simmer over low heat until the grains are tender and reveal their spiraled germ, about 15 minutes.
  • Warm half the oil in a wide skillet. Add the scallions and chiles, cook over medium heat for about 2 minutes, then add the garlic, cumin, corn and spinach, along with 2 tablespoons water. When the spinach is wilted, add the cilantro, quinoa and feta. Toss everything together, taste for salt, and season with pepper.
  • Heat a tablespoon of oil over medium heat in a wide skillet. When hot, add the onions and sauté, stirring frequently, until they start to brown around the edges, after several minutes. Pour in the wine and deglaze the pan, giving the onions a stir as you do so. Season with salt and pepper and distribute in a baking dish (or two) large enough to hold the peppers.
  • Slice the peppers in half lengthwise without removing the tops or stems, then cut out the membranes and seeds. Simmer them in salted water until tender to the touch of a knife but not overly soft, 4 to 5 minutes, and remove. Fill them with the quinoa mixture and set them in the baking dish(es).
  • Preheat the oven to 400° F. Drizzle the rest of the oil over the peppers and bake the peppers until heated through, 20 to 30 minutes, then switch the heat to broil and brown the tops. Serve hot, warm or at room temperature.
My notes: I skipped the whole onion/wine part. Maybe I would have enjoyed the peppers themselves if they had been cooked on top of a bed of glazey, winey, onions. But whatevs, I was making this on a weeknight and something had to go to make this a viable dinner option. And I halved this recipe so it made just enough for the two of us. I highly recommend giving it a shot, especially the filling. Mmmmmm.

Monday, June 27, 2011

Favorite Things

Totally forgot to share that Molly at A Few of My Favorite Things was kind enough to share a few of MY favorite things a couple Fridays back. Click here if you'd like to take a peek! Thanks Molly!

Tuesday, June 21, 2011

Baked Zucchini Fries

Lately guys, I've been pinning. Do you guys pin? Pinterest has been such a great resource for gatherings ideas for all different areas of my life-- decor, fashion, and even cooking. I came across this image a while back and I knew it definitely needed to be put on the To-Cook list. So I pinned and eventually got around to making it. The photo I pinned took me to Our Best Bites's version of Baked Zucchini Fries, and I noticed that her recipe was an adaptation of one from Aggie's Kitchen. I feel like I'm playing six degrees of the food blogs, ha. Anyhow, I looked over both versions and went with something sort of in between. I served this alongside some grilled Italian sausage. We had some sweets to eat on hand, so I kept dinner short and to the point that night. These turned out really deliciously. Josh enjoyed them too, and I'm glad to have another way to prepare one of our favorite veggies.

Baked Zucchini Fries
Adapted from Aggie's Kitchen and Our Best Bites; Serves 2
Baked Zucchini Fries
1 medium-to-large zucchini
1 egg
1/4 cup plain panko breading
2 tablespoons grated Parmesan cheese
1/2 teaspoon dried oregano
1/4 teaspoon dried garlic powder

  • Preheat oven to 425 degrees. Coat a foil-lined baking sheet with cooking spray. Set aside.
  • Trim the ends from your zucchini. Halve it crosswise, then halve each piece lengthwise. Again, halve each piece lengthwise, so that you have several "planks" of zucchini. Then slice your zucchini planks into sticks lengthwise.
  • Whisk your egg in a shallow bowl or deep plate. Mix the panko, Parmesan, oregano and garlic powder in another shallow bowl or plate.
  • Working with several zucchini sticks at a time, coat them completely in the egg mixture and then coat them in the breading. Place on your prepared baking sheet and continue until all the fries are dipped and breaded.
  • Bake zucchini fries for 10-12 minutes. Flip each fry over, and continue baking for another 10 minutes. Serve.
My notes: If the directions for slicing the zucchini seem confusing, jump over to Aggie's Kitchen or Our Best Bite through the links above. They both have excellent tutorial photos for preparing the recipe. Also, this is a halved version of the recipe, since there's just the two of us. I think next time I might try the plain breadcrumbs to see what the difference is.

Thursday, June 16, 2011

Tuna and White Bean Lettuce Wraps

I have long been enamored with the combo of white beans and tuna, but had yet to actually try it. I would stare at photos and recipes that I came across in magazines or other food blogs. I would tell myself, "You really gotta try that soon." Finally, one day, I listened to the thoughts in my head and I got in the kitchen. I followed Tracy's recipe over on Shutterbean, which is an adjusted Sunset magazine recipe. She served hers on some toasted bread. I had some lettuce, fresh from the pop-in-law's garden, so I decided to do some little wraps for our weekend lunch. This recipe was quick to put together and tasted crisp and bright. I love finding new ways to serve canned tuna, which is one of my favorite pantry staples. Makes you wonder why it took me so long to try, doesn't it?

Tuna & White Bean Lettuce Wraps
Recipe from Shutterbean
Tuna and White Bean Salad
1 can tuna in olive oil, drained
2 ribs celery sliced thinly
1 14 oz. can white cannellini beans, drained and rinsed
1 tablespoon flat leaf parsley, chopped
1 big glug olive oil
1/4 of a red onion, chopped
Splash of red wine vinegar
Juice from half a lemon
Salt & pepper to taste

  • All you gotta do is put everything in a bowl and mix it up right good.
My notes: I think I could have been a little heavier handed with the vinegar and lemon juice, but overall it came out great!

Tuesday, June 07, 2011

Almond Joy Ice Cream

Guys, I usually don't brag. Well, maybe I do about a few things- like my Beatles knowledge, or my encyclopedic TV theme song memory. But in the kitchen I am most definitely not a bragger. After years of blogging here and trying hundreds of recipes I'm just as slow with a knife as I was when I started. Recipes regularly take me longer than the estimated time. I regularly have recipes that just don't come out how I'm hoping. But, this time I'm gonna brag. And really, I don't have a right to because I didn't come up with this recipe myself, but every time I taste this dish I just can't believe it came out of my kitchen. Or, more aptly, my freezer. Sometime back I came across a recipe for Quick Coconut Ice Cream with Roasted Cherries and tweeted about wanting to make it. Now that warm weather is most definitely here in Texas it felt like the right time to pull out the ice cream maker and tick this one off the to-cook list. Cherries however are still rather costly right now. Instead I thought I'd go in the direction of one of my favorite candy bars, and I chose toasted almonds, toasted shredded coconut, and Ghiradelli 60% cacao chocolate chips. If you have an ice cream maker, and no aversion to the flavors of coconut, almonds, or chocolate then you need to make this ice cream NOW. In fact, I'm gonna have a bowl when I'm done with this post. It's the second batch I've made in as many weeks. I'm hard pressed to imagine ever making another flavor of ice cream again. But of course I will, because who doesn't want to eat lots of yummy ice cream? And I'll need lots of yummy ice cream to share on here!

Almond Joy Ice Cream
Adapted from The Kitchn; Makes 1.5 quarts
Almond Joy Ice Cream
1 14 ounce can coconut milk
1 cup cream
1 14 ounce can sweetened condensed milk
Pinch of salt
Sliced almonds
Shredded sweetened coconut
Ghiradelli 60% cacao chocolate chips, roughly chopped

  • Preheat oven to 350 degrees. Toast sliced almonds and shredded coconut for 5 minutes, tossing once or twice during.
  • In a large bowl, whisk together the sweetened condensed milk and cream until very well blended. Add coconut milk and salt and mix until well blended again. Pour mixture into your ice cream maker and follow your machine's instructions to complete.
  • Add your mix-ins according to the instructions of your ice cream maker.
My notes: I use slightly less than 1/4 cup of each mix-in. Once the almonds and coconut are toasted I transfer them to a bowl to cool. Once they're cool I add the chocolate and pop it in the fridge so that they'll be a little cool when I add them to the soft ice cream. Before making the ice cream I also pop the coconut milk and sweetened condensed milk into the fridge for awhile so that the ingredients are already cold when they go into the machine. These steps aren't absolutely necessary, just helps things come together. My machine's instructions say to mix your ice cream for 25-30 minutes. I typically run mine 25, and I add the mix-ins at the 20 minute mark. Your newly made ice cream should spend at least 2 hours in the freezer to firm up, longer if possible. And remember that homemade ice cream melts quickly since there aren't any preservatives in it!

Tuesday, May 31, 2011

Ratatouille

A Sprouts market recently opened nearby and I am loving their lower produce prices. I get their advert in the mail each Tuesday, which gives me plenty of time to incorporate some of their cheaper produce in my menu for the next week. Recently they had eggplant, zucchini, yellow squash, and bell peppers on sale. Hot diggity! I knew just what I wanted to make with that veggie combo-- ratatouille. It'd been years since I made ratatouille, usually because one or another ingredient always seems too pricey to me. (I'm cheap, if you haven't gotten that from this post yet, ha.) I boiled up a little leftover penne I had in the pantry, just enough for one plate for Josh, and topped it with the vegetable stew. I ate mine plain, and we both had some toasted bread and a sprinkling of grated Parmesan on top. Such a tasty way to get some summer vegetables in your diet.

Ratatouille
Recipe from Martha Stewart; Serves 8
Ratatouille and Penne

1/3 cup olive oil
2 medium onions, chopped
4 cloves garlic, minced
2 large eggplants (2 pounds), peeled in strips and cut into 3/4-inch cubes
4 to 5 medium zucchini (2 pounds), cut into 1-inch cubes
Coarse salt and ground pepper
3 yellow or red bell peppers, ribs and seeds removed, cut into 3/4-inch cubes
1 can (28 ounces) diced tomatoes
1 teaspoon dried thyme
1/2 cup chopped fresh basil
  • In a Dutch oven (or other heavy 5-quart pot with a tight-fitting lid), heat oil over medium heat. Cook onions, stirring occasionally, until soft, about 5 minutes. Add garlic; cook until fragrant, about 1 minute. Stir in eggplant and zucchini; season generously with salt and pepper.
  • Add 3/4 cup water; cover, and simmer until vegetables are beginning to soften, stirring once, about 5 minutes. Stir in bell peppers; simmer, covered, until softened, 5 minutes.
  • Stir in tomatoes and thyme; bring to a boil. Reduce heat to medium-low. Partially cover; simmer, stirring often, until vegetables are tender, 15 to 20 minutes. Remove from heat. If serving immediately, stir in basil. (If freezing, leave out basil.)
My notes: I halved this recipe since it was just the two of us, and that gave us each a dinner and lunch of leftovers. I used yellow squash for half the zucchini too.

Monday, May 23, 2011

Peaches & Cream Stuffed French Toast

This past week has been a complete whirlwind. Well, to be honest the last month has been one, between finishing up school work, finals, housework, regular work, etc. But Josh had show, after show, after show booked this past week, and it culminated in a weekend of almost non-stop movement. Friday night he played in Austin, Saturday evening in Addison, then later that night in Texarkana. When he plays in Austin our friends Niki & Veronica are kind enough to let us stay with them. To say thanks I brought some french toast fixings with us this time. Veronica picked up some fresh berries, mimosa fixings, and the milk that I'd forgotten to bring with me (d'oh!), and it all made for a delicious meal. After a pretty rushed week, it was nice to sit and have a good breakfast with good friends before we hit the road again.

Peaches & Cream Stuffed French Toast
Recipe adapted from Martha Stewart; Serves 4
Peaches & Cream Stuffed French Toast
8 oz. cream cheese, room temperature
1/4 cup peach preserves
1/2 teaspoon cinnamon-sugar
8 slices challah, appx. 1" thick
6 eggs
1 1/2 cups milk
Pinch of salt
Unsalted butter

  • In a small bowl, mix the cream cheese, preserves, and cinnamon-sugar until well blended.
  • Using a small knife, cut a slit in each slice of challah, lengthwise along the bottom to create a pocket.
  • Fill each pocket with the cream cheese mixture and press slightly to seal, scraping off any excess from the bottom of the bread.
  • Whisk together eggs, milk, and salt in a bowl.
  • Soak both sides of each slice of bread in the egg mixture very well.
  • Heat butter in skillet or griddle over medium heat. Fry bread until golden brown, 2 to 3 minutes per side. Serve warm. You can keep prepared slices warm in the oven while you continue cooking the rest.
My notes: I use a stripped down version of a Martha Stewart recipe for the batter, and created the stuffing mixture on my own. I sliced and stuffed the challah Friday morning, so at Niki & Veronica's on Saturday I just had to whip up the batter and get to griddling. I kept the bread refrigerated until about an hour before I cooked it. This came out really yummy. I think I could have fit a bit more filling into some of the slices, so I'm going to try and get them a bit fuller next time. I had some filling leftover, which is excellent on a bagel, or leftover challah slices.

Wednesday, May 04, 2011

Chocolate Glazed Doughnuts

Last week I knew I was going to have a long weekend ahead of me. I had an English paper due the following Monday that I hadn't even started, and I had a three page math review to complete. I knew I was going to have to take action if I didn't want the entire weekend to be a bummer. That action was making donuts. How could I not find at least one bright spot if there were donuts involved? I used my usual trick for the doughnut part. I decided I wanted to try a chocolate glaze this time. Some googling led me to a recipe that I had most of the ingredients on hand for, and it turned out pretty well. I didn't have any milk, but I did have some leftover cream in the fridge, so I used that. I used a little too much really. My glaze wasn't so thin that it just ran right off, but it never quite developed the thin top layer that most glazes do. I'll know to restrain myself a little when it comes to the dairy next time. I'll also cut the whole recipe in half. I had a lot leftover, especially since I only made 6 doughnuts this time, reserving some of the biscuits for bacon and eggs the next day.

Chocolate Glaze
Recipe from Emeril Lagasse; Makes 2-3 cups
Chocolate glazed donuts
1/4 cup cocoa powder
1 cup powdered sugar
5 tablespoons milk

  • In a small bowl, combine the cocoa powder and the powdered sugar. Add in the milk and whisk until smooth.
  • After letting the fresh doughnuts drain on a paper towel for a moment, dip the top of a doughnut into the glaze. Set on wire rack. I topped two small plates with sprinkles and coconut flakes and dipped some of my doughnuts and doughnut holes in them for a little extra fun.

Tuesday, April 26, 2011

10 Minute Fruit Tart

This weekend was, well, far from what I expect of a weekend. Very little relaxing and yet very little accomplished. Most of our time was committed to other people, with very little left to ourselves, most of which went to sleep. Saturday was my father-in-law's birthday and we'd made plans to have dinner at their place Sunday night. They asked us on Saturday to bring the fruit tart that he wanted for dessert. I said sure thing, and then promptly didn't concern myself with it again until Sunday morning. We had a very late night Saturday, so we slept in quite a bit. When I arose I popped open my netbook to check the weekly ads for our grocery errands. And then I realized that most of the stores were closed for Easter. I'm a genius. Now, not only can I not buy my regular groceries, but I can't find the fruit tart that my father-in-law requested for his birthday. Luckily there was a Kroger in our neighborhood that was open, but they of course didn't have any fruit tarts in their bakery. Now I was faced with having to come up with something on my own. Let's be honest here, this tart isn't anything amazing. I more or less pulled a Sandra Lee on this one, which I'm not very excited about. But, it came together quickly, easily, and everyone really enjoyed it. So, I figured why not share it? It's getting warmer, and with warmer weather comes more picnics and cookouts. Maybe you'll need a quick dessert, and maybe this will be it. I'm going to give you the rundown of what I did and how I did it to get this thing together in 10 minutes, not so much a recipe as a process I guess.

10 Minute Fruit Tart
1 9 inch prepared graham cracker crust
1 large box instant vanilla pudding
3 cups milk
1 cup whipping cream
1 tablespoon sugar
1 teaspoon vanilla extract
1 pint strawberries, sliced
1 pint blueberries
1 pint raspberries

  • Put the bowl you'll use for making whipped cream in the fridge to chill. Put your milk in the freezer. Rinse and pick over your berries.
  • Take your milk out of the freezer; put your cream in the freezer. Combine your pudding mix and cold milk and follow the pudding's instructions; mine said to beat for 2 minutes, let set for at least 5. Once done beating put the bowl of pudding in the refrigerator. Remove your empty bowl and whipping cream from the fridge and freezer.
  • Beat the whipping cream on medium-high until soft peaks form. Sprinkle the sugar and vanilla over the cream, and beat again until soft peaks form, being careful not to over-whip.
  • Put your whipped cream in the refrigerator. Slice your strawberries to your desired size. By now the pudding should be set. Spread pudding evenly into the pie crust. Top with your fruit, in whatever design you'd like.
  • If you want to go the extra step, I used a piping bag to pipe some of my whipped cream on top. I had some fruit leftover, and obviously plenty of whipped cream, which we topped the plated slices with at dinner. You could also spread a layer of whipped cream on top of the pudding and then top with the fruit, or keep all the whipped cream for the side. Whatever tickles your fancy.
My notes: Popping my milk, cream, and bowls in the fridge and freezer just helped things come together a little more quickly. Especially since I started on this as soon as I returned from the store, so my dairy products had been out of the cooler for a little while by that point. Homemade whipped cream takes so little time to make and I think it adds at least a little something to a dessert that relies so much on shortcut goods.

Thursday, April 07, 2011

Pineapple and Black Bean Salsa

My taco kick continues, as last night I made fish tacos using this recipe and some trout we received from the father-in-law. Kept things pretty much the same as the shrimp tacos I shared last week- slaw, pico, sour cream, and feta topped things off again, but this time with a few dashes of hot sauce instead of leftover marinade. On the side I served up this Pineapple and Black Bean Salsa with some tortilla chips. I came across this recipe in the March 2011 issue of Everyday Food, in their feature on pineapple (which is also where I found the recipe for the Jerk Pineapple Pork Chops I recently shared). This made a really light and flavorful accompaniment to our fish tacos. I've got some leftovers in the fridge that I'll definitely be enjoying over the weekend.

Pineapple and Black Bean Salsa
Recipe from Everyday Food; Makes 4 cups
Pineapple Salsa

1 can (15.5 ounces) black beans, rinsed and drained
1 1/2 cups chopped pineapple
1 jalapeno, stemmed, seeded, and minced
3 tablespoons finely chopped red onion
1/4 cup chopped fresh cilantro
1 tablespoon fresh lime juice
Coarse salt
  • In a medium bowl, combine black beans, pineapple, jalapeno, red onion, cilantro, and lime juice. Season with salt.
My notes: I kind of eyeballed the red onion and cilantro and things worked out just fine. This could also be good served over rice on the side of some fish or chicken, I think.

Tuesday, March 29, 2011

Cilantro-Lime Shrimp Tacos

During my "spring break" Josh got off work early one day, so we decided to go have lunch together. We sat on the patio at Yucatan Taco Stand and split a giant pile of veggie nachos. Josh also got a couple tacos, and I got one for myself as well. I chose the Spicy Tequila Shrimp, and I've been craving shrimp tacos ever since. I decided I just needed to go ahead and throw some together for dinner, and I did just that last night. I took the easy way out and used frozen, pre-cooked shrimp. They thaw so quickly, and now I've got more taco-fillers in the freezer for another dinner soon. I looked for a quick and easy marinade and found this one from, who else, Martha Stewart. I kept things super simple by buying ready-to-go taco toppings and heat-and-eat Goya brand Black Bean Soup. I thawed the shrimp while I made the marinade, and was able to do most of my math homework while they marinated in the fridge. Then it was just a matter of heating the shrimp and black beans, putting our topping choices out on the counter, and we were ready to chow down. I'm definitely going to be doing this again; so quick, easy, and delicious. I know you can barely even see shrimp poking out at the edges, but the taco fillings are so yummy, I piled them on high!

Cilantro-Lime Shrimp Tacos
Adapted from Martha Stewart; Serves 2
Cilantro-Lime Shrimp Tacos
1/4 cup olive oil
1/2 teaspoon finely grated lime zest
2 tablespoons fresh lime juice
1/4 cup fresh cilantro leaves
1 garlic cloves, crushed
1/4 jalapeno chile, coarsely chopped
1/4 teaspoon coarse salt
Appx. 30 small shrimp, fresh or frozen, thawed
6 corn tortillas, warmed
Toppings: Shredded cabbage (I used bagged coleslaw mix), pico de gallo, crumbled feta, sour cream, reserved marinade

  • Puree oil, lime zest and juice, cilantro, garlic, jalapeno, and salt in a blender or food processor. Combine marinade and shrimp. Cover with plastic wrap, and refrigerate 1 hour.
  • Head grill or grill pan over medium-high. Grill shrimp until opaque and slightly charred, 3 to 4 minutes per side. (I just heated ours on the grill pan, since they were pre-cooked.)
  • Divide shrimp among warmed tortillas, and add toppings of your choice.
My notes: I reserved around 2 tablespoons of the marinade before pouring it over the shrimp. We drizzled it on top of some of our tacos, and I mixed a little into some sour cream for two of mine.

Wednesday, March 23, 2011

Penne with Spinach and Roasted Veggies

This blog is really starting to live up to it's name these days. Small time and simple is the name of my meal game most of the time. Last night I needed something for dinner, and I knew it needed to be veggie based. I'd had three servings of fruit that day, but not one bite of a vegetable. I usually make a salad each for Josh and I on weekdays to take to work for lunch. I stayed home yesterday though, so my share of the veggies I usually top our salads with was up for grabs. I also have several half-empty boxes pasta in the pantry. So, I grabbed some penne, my veggies, a little butter and parmesan, and got to work. This was really delicious. Next time I'll probably go without the butter and give everything a hearty squeeze of lemon juice instead. There isn't really a whole lot of instruction to give- I tossed broccoli florets, small red and yellow pepper strips, half-rings of red onion, and a clove of garlic with olive oil, salt and pepper and roasted them for about 12 minutes at 425 degrees. I boiled my penne, and after draining I tossed it with some butter and a handful of spinach, to get it just a teeny bit wilty. Add the veggies, smash and add the roasted garlic clove, then toss and top with some shredded parmesan. Delicious!

Penne with Spinach and Roasted Veggies

Tuesday, March 15, 2011

Stack of Stuff- Egg, Mushrooms, Spinach, and Onion Over Polenta

I'm on spring break this week. Please imagine me saying "spring break" with quotey fingers, because it's a bit of a joke. I'm, of course, still at work. I've still got chores to get done. And worst of all, plenty of homework so I'll be ready for the two tests awaiting me next week. Oh, and my poetry analysis is due too. Blerg. Anyway, I knew I needed to do at least a little cooking this week, even if I'm still plenty busy. Mushrooms were on sale this week, I had a little extra spinach in the fridge, and I've been craving eggs lately. I decided polenta, onion, and parmesan would round things out nicely. This was a pretty simple and quick dinner to put together. I need to remember things like this more often. Simple is key for me, with so little time on my hands.

Egg, Mushrooms, Spinach, and Onion over Polenta
Serves 2
Egg, mushrooms, spinach and onion over polenta
1/2 tube firm polenta, in 1/2" slices, about 6
1/2 red onion, thinly sliced
10 oz. mushrooms- cleaned, trimmed, and quartered
3 cups fresh spinach
2 eggs
Olive oil
Shaved parmesan
Balsamic vinegar

  • Heat your polenta according to your taste- I pan fried in butter, then kept warm in a 250 degree oven while I prepared the rest of the ingredients.
  • Heat 1 to 2 tablespoons olive oil over medium heat; add onion, season with salt; as onions begin to soften add mushrooms. Sprinkle with balsamic vinegar and stir occasionally. Cook until onion and mushroom are softened and golden.
  • Cook eggs according to your taste- I fried ours sunny side up (except that I overcooked mine a little and broke the yolk of Josh's, oh well). Meanwhile, add your spinach to the onion and mushrooms and stir until wilted down.
  • Plate your polenta, top with mushroom mixture, egg, and add some shaved parmesan, if you wish.

Sunday, March 06, 2011

Jerk Pineapple Pork Chops

Hi! Long time, no blog- I know. Even my personal blog has fallen to the wayside as school has taken over everything. We've been sustaining ourselves with a lot of Amy's frozen burritos, sandwiches, and bad for us junk food. But you do what you can to get by, I guess, when everyone in a household is juggling multiple jobs and responsibilities. I still, despite my workload, get the urge to cook sometimes and last week I bowed to it's will and decided to try a recipe from the latest Everyday Food. Pre-cut pineapple were on sale, so I thought I'd give the recipe for Jerk Pineapple Pork Chops a shot. This came out pretty good. If anything it made me think about the possibility of marinating meat more often. Being able to prep it and stick it in the fridge for an hour while I did homework is an easy way to have something a little more interesting for dinner. And when you do something very simple like rice or couscous on the side it can definitely be low maintenance.

Jerk Pineapple Pork Chops
Everyday Food; Serves 4
Jerk pineapple pork chops

2/3 of a whole (4 pound) pineapple, peeled
1 bunch scallions, sliced crosswise into 1" pieces
1/2 small habanero or 1 large jalapeno, stemmed and seeded
2 teaspoons dried thyme
4 garlic cloves, smashed and peeled
1 1/2 teaspoons ground allspice
4 bone-in pork chops (3/4" thick, appx. 6 oz. each)
coarse salt and ground pepper
2 tablespoons extra-virgin olive oil

  • Cut four 1/2" thick rounds from pineapple; set aside. Cut remaining pineapple into large chunks, discarding core. In a food processor, combine pineapple chunks, scallions, chile, thyme, garlic, and allspice and pulse until coarsely chopped. Reserve 3/4 cup pineapple marinade and refrigerate.
  • Season pork with salt and pepper and place in a 9-by-13-inch glass baking dish along with pineapple rounds. Top pork and pineapple with remaining pineapple marinade and turn pork and pineapple to coat. Cover with plastic wrap and refrigerator 1 hour (or up to 4 hours).
  • In a large nonstick skillet, heat 1 tablespoon oil over medium-high. Working in tow batches, brush pineapple mixture off pork and cook chops until browned and cooked through, 10 minutes per batch, flipping once. (Reduce heat if pork begins to overbrown.) Add 1 tablespoon oil to skillet. Brush pineapple marinade off pineapple and cook rounds until golden brown in spots, 5 to 7 minutes, flipping once. Serve with pork and reserved pineapple marinade.
My notes: I served this with rice. I didn't have any more marinade on mine, and I enjoyed it. Josh did add more marinade and enjoyed it. So there ya go, either way it's delicious.

Tuesday, January 11, 2011

Laying all the Recipe Cards on the Table

Sorry that I haven't been around for a while. There were school finals, then lots of holiday events, birthday parties, and just general busyness. I'm still going to be posting occasionally, but with an even heavier school load this coming semester (starts next week!) I know that it's going to be sporadic at best. I do however actually have a recipe to share- shocking, I know! I had a long list of to-do's for my winter break, half of which of course have not gotten done. Funny how when you still work full time your winter school break doesn't really seem like much of a break. But, I have managed to get some casseroles into the freezer, which was one item on that long list. I even managed to finally make this Everyday Food recipe for Chicken Tetrazzini. This was in the April 2007 issue. Yes, 2007. As in 3, almost 4, years ago now. And it had been on my to-cook list since then. So, I guess this dish did more than double duty- it made two meals, but it also let me cross something off two lists! This recipe was time consuming for me, but I knew it would be so I blocked off a whole evening to make it. It's not that it's terribly hard, but I'm a slow worker and the prep work of shredding a whole rotisserie chicken and cleaning mushrooms took me awhile. It did come out deliciously though, and considering I've got one in the freezer for later I would say the effort was well worth it. I only wish I hadn't waited so long!

Chicken Tetrazzini
Recipe from Everyday Food; Serves 8
Chicken Tetrazzini

Coarse salt and ground pepper
6 tablespoons butter
1 pound white mushrooms, trimmed and sliced inch thick
1/2 cup all-purpose flour
3 cups milk
1 14.5 ounce can reduced-sodium chicken broth
3/4 cup dry white wine
3 cups grated Parmesan cheese
1/2 teaspoon dried thyme leaves
1 pound linguine, broken in half
1 rotisserie chicken, skin removed, meat shredded (about 4 cups)
1 package (10 ounces) frozen peas, thawed and drained

  • Preheat oven to 400. Bring a large pot of salted water to a boil (for pasta). In a large saucepan, melt 2 tablespoons butter over high heat. Add mushrooms, and season with salt and pepper. Cook, tossing frequently, until tender and browned, 8 to 10 minutes. Transfer to a bowl, and set aside.
  • Make sauce: In same saucepan, melt remaining 4 tablespoons butter over medium heat. Add flour; cook, whisking, about 1 minute. Whisking constantly, gradually add milk, broth, and wine. Bring to a boil; reduce to a simmer, and add 2 cups Parmesan and thyme. Season with salt and pepper.
  • Cook pasta 2 minutes less than package instructions for al dente; drain and return to pot. Add sauce, chicken, peas, and mushrooms. Toss well to combine. Divide between two shallow 2-quart baking dishes; sprinkle with remaining Parmesan. Freeze (see below) or bake until browned, about 30 minutes. Let stand 10 minutes before serving.
  • To freeze: After placing pasta mixture in baking dishes and sprinkling with Parmesan (step 3), cool to room temperature. Cover tightly with aluminum foil, and freeze up to 3 months.
  • To bake from frozen: Bake, covered with foil, at 400 degrees, until center is warm, about 2 hours. Uncover, and bake until top is browned, about 20 minutes more. Serve.
  • To bake from thawed: Thaw overnight in refrigerator. Bake, covered with foil, at 400 degrees, until center is warm, about 30 minutes. Uncover, and bake until top is browned, about 20 minutes.
My notes: I didn't thaw the peas. Instead I just tossed them in during the last minute on the pasta's cook time. That did the trick just fine. Also, I bought bags of pre-shredded Parmesan cheese; recipe says grated, but the shredded worked just as well with less prep work from me. Also, I'm sure I've mentioned before, when freezing my casseroles I always wrap it first with plastic wrap and then with aluminum foil. I have to remove the plastic before I can put it in the oven, but I feel like the casseroles keep better this way.

Related Posts with Thumbnails