


A couple weeks ago I had big plans for making a simple meal. I came across Elise's recipe for Huevos Rancheros and had added it to week's menu. I was going to make the salsa like her, and it was going to be grand. And someday I will. But I got home, beat down by a day of work and problematic sleep patterns. I couldn't have cared less about chopping an onion and smooshing tomatoes with my hands. But I still needed to eat and was hungry at that. So, I took the easy way out. Boy, am I glad I did too. Always so happy to have something that is meal-like without requiring a meal sized effort.
Fast & Easy Huevos Rancheros
Eggs
Corn Tortillas
Salsa
And that's pretty much all you need to know. You like your eggs scrambled? Go for it. Soft yolks? Have at it. I like my eggs cooked through and through, so that's what I made. Warmed corn tortillas, topped with egg, topped with salsa. Alter as you see fit. :)
Wednesday, June 25, 2008
No Energy Cooking

Friday, June 20, 2008
Creamy or Crunchy? Peanut Butter Granola
I have been finding a lot of inspiration lately over at Everybody Likes Sandwiches and this is just one more recipe that turned out great. Seems like granola has been popping up everywhere, especially since Molly at Orangette posted her recipe for chocolate granola, which is waiting patiently for me on my to-cook list. But this peanut butter granola called out to me with a stronger siren song. And I'm glad I listened. I thought this recipe was really good and Josh loved it. It's also incredibly easy, so if you can stand the heat get in that kitchen and get some in the oven.
Peanut Butter Granola
Recipe from Everybody Likes Sandwiches; Makes about 3 cups
2 1/2 c oats
1/2 c wheat germ
1 t vanilla extract
2 T canola oil
3 T natural peanut butter
2 T brown sugar
3 T chopped chocolate (optional)
- Preheat oven to 325 degrees. In a large bowl, mix oats and wheat germ together. Set aside. In a small saucepan, heat up oil, peanut butter, vanilla and brown sugar over medium high heat and let it all get melty together. Pour hot mixture over oats and stir well, so that everything is covered. You may have to use your hands if your peanut butter mixture is extra stiff. Add chocolate, if using, and mix well.
- Spread mixture on a baking sheet or large glass baking pan and toast in oven for 20-30 minutes, checking on it and stirring it occasionally until mixture is dry. When cool, store in a tightly lidded container.
Tuesday, June 17, 2008
Graham Cracker Addict
My husband is a self-proclaimed graham cracker addict. Considering there are much worse things a person could be hooked on this doesn't really bother me. And although I would hardly consider store-bought graham crackers to be very expensive, we were buying them so often that I started to wonder if I couldn't just whip up our own. A lightening quick Google search lead me to a recipe on bakingsheet, which has long been transformed into Baking Bites. The recipe looked so simple that I decided I would definitely give it a shot. This is the second time I've tried this recipe and this was the closest I've gotten to what most people expect from a graham cracker. I think next time I make them they will be perfect. And now the kitchen is stocked for my hubby to grab a fix whenever he needs it. Guess I need to get around to trying one of those marshmallow recipes that have been so ubiquitous in the blogosphere as of late!
Homemade Graham Crackers
Recipe adapted from Retro Desserts by Bakingsheet; Appx. 48 crackers
1/2 cup all-purpose flour
1 3/4 cups whole-wheat flour
1/2 cup sugar
1 teaspoon baking powder
1/2 teaspoon baking soda
1/2 teaspoon salt
1/4 teaspoon ground cinnamon
1/2 cup cold butter, cut into 1/2 inch cubes
2 tablespoons honey
2 tablespoon molasses
1/4 cup cold water
1 teaspoon vanilla extract
- In a food processor, mix together the flours, sugar, baking powder, baking soda, salt, and cinnamon. Add the cold butter and process until the mixture resembles coarse meal, about 30 seconds or so. Add the honey, molasses, water, and vanilla. Mix until the dough startes to come together in a ball, another 30 seconds. Scrape dough out of the mixer.
- Between 2 sheets of waxed or parchment paper, roll the dough 1/8-inch thick. Chill for at least 1 hour, until firm (I chilled for several hours).Preheat oven to 350F. Retrieve dough and roll it a bit more if it is not yet 1/8-inch thick. With a sharp knife or pizza cutter, cut into 2-inch squares. Arrange the crackers on parchment lined baking sheets. With a toothpick, prick several holes in each cracker.
- Bake for 15 minutes, until lightly browned at the edges. Remove from the oven and let cool on the pan.
- Note: If you cut the dough through but leave the squares together, you can break them up after they're baked, just like a store-bought graham.
Thursday, June 12, 2008
Baked Ravioli
So, last week I finally knocked a recipe off my to-cook list that had been there from the start. Who knows why I waited so long to get around to it. But now that I've finally made it I know that the next time I make it things will be done differently. Don't get me wrong, this recipe is a good idea. The execution of it though left something to be desired. Next time I'll even probably use store-bought sauce. That probably sounds a wee bit lazy, but the whole time I was eating it I was thinking that it could be better. And the easiest way to make it better is to use our favorite jarred sauce. There was also too much sauce. That is partly due to the fact that I had a package of raviolis that was smaller than the recipe called for. Whatever the reason, too much of a mediocre sauce isn't really a good thing. Lastly, don't put my mozzarella on top of my parmesan. The mozzarella just stuck to the Parmesan and nothing else, resulting in a crust of cheese totally separate from the rest of the dish. Who knows, maybe I should have waited even longer to make this, ha.
Baked Ravioli
Recipe from Everyday Food; Serves 4 to 6
2 tablespoons olive oil
1 medium onion, chopped
3 cloves garlic, minced
Coarse salt and ground pepper
1 1/2 teaspoons dried thyme, or oregano
1 can (28 ounces) whole tomatoes
1 can (28 ounces) crushed tomatoes
2 pounds store-bought ravioli
1 1/2 cups shredded mozzarella cheese
1/2 cup grated Parmesan cheese
- Preheat oven to 425 degrees. Heat oil in a large saucepan over medium heat. Add onion and garlic, and season with salt and pepper; cook, stirring occasionally, until softened, about 5 minutes. Add thyme and tomatoes. Bring to a boil, reduce heat, and simmer, breaking up tomatoes with spoon, until sauce is thickened and reduced to about 5 1/2 cups, 20 to 25 minutes.
- Meanwhile, cook ravioli in a large pot of boiling salted water just until they float to the top (pasta will continue to cook in oven). Drain pasta; return to pot.
- Toss sauce with pasta. Pour pasta into a large gratin dish or 9-by-13-inch baking dish, and sprinkle with cheeses. Bake until golden, 20 to 25 minutes. Cool slightly before serving.
Monday, June 09, 2008
Picnic Eats

We certainly didn't sustain ourselves on cookies alone, so here's some info on the rest of our picnic dinner from last weekend. I tried to make things nice and summery, but also not too difficult or messy. The best idea for planning a meal away from your kitchen, or any meal for entertaining really, is to combine ready-to-eat items with homemade recipes. And ready-to-eat doesn't have to mean anything heavily processed. Our meal consisted of Caprese sandwiches, roasted corn on the cob, garlic-rosemary baked chips and fresh fruit. Fruit didn't need anything other than a good rinse and it was ready to go. The chips came in a resealable bag making them great for outdoor eating and travel. There's half our meal taken care of in no time flat, leaving me time to make those delicious cookies we had for dessert. Roasting the corn was also pretty quick and easy. The Caprese sandwiches are my current favorite- so good. Might want to put this recipe off until the tomato scare is over, but when it is I'll be making more for sure. Overall it was picnic perfect!
Caprese Sandwiches
Serves 4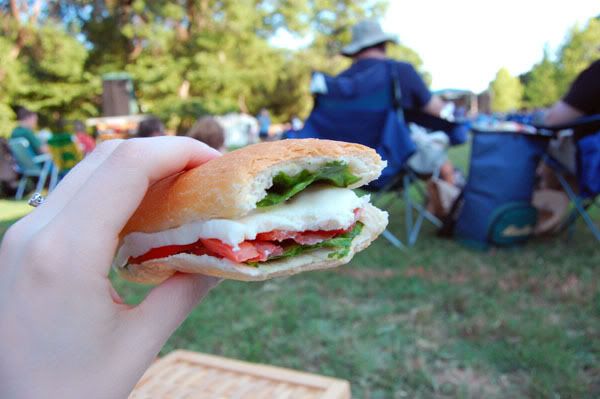
1 fresh baguette
1 bunch fresh basil
2 roma tomatoes, seeded and thinly sliced lengthwise
8 oz. fresh mozzarella, thinly sliced
Olive oil
Coarse salt and ground pepper
- Slice the baguette crosswise into 4 pieces as evenly as possible. Slice each piece in half lengthwise. Brush each slice lightly with olive oil; season lightly with salt and pepper.
- Starting with the bottom slice of baguette, layer fresh basil leaves, tomato slices, and mozzarella. Top with additional basil leaves and second baguette slice.
- To pack for picnic: press sandwich together and wrap tightly with plastic wrap or wax paper. Secure with twine or tape. Store in cooler, in freezer bag if necessary to protect from too much moisture.

As many ears of corn as you'd like to prepare
Butter
Coarse salt and ground pepper
- Preheat oven to 375 degrees. Pull back corn husks and remove silks from the ears. Brush corn with butter and season with salt and pepper. Pull husks back up over corn and secure with kitchen twine.
- Roast corn on a baking sheet for 25 minutes, turning over once.
- To pack for picnic: allow to cool some before wrapping with wax paper and securing with twine. Pack in picnic basket.
Thursday, June 05, 2008
Peachy Keen: Fresh-Peach Drop Cookies
Last week as soon as Josh and I decided to go to the Concert in the Garden, I knew I had to find a great treat to take with us on our picnic outing. Something summery, something sweet, and most importantly something easy for hand-held eating. I thought I'd hit the jackpot when I found this recipe, and I was right. Josh used words like "heaven" and "gold" to describe these cookies. And he's not even very fond of peaches. I think that pretty much says it all, don't you?
Fresh-Peach Drop Cookies
Recipe from Martha Stewart Living; Makes appx. 4 dozen
2 cups all-purpose flour, plus 2 tablespoons
3/4 teaspoon salt
1/2 teaspoon baking soda
1 stick (8 tablespoons) unsalted butter, room temperature
1 cup granulated sugar
1 large egg
1/2 teaspoon pure vanilla extract
2 large ripe peaches, peeled, pitted, and cut into 1/4-inch dice
1/3 cup peach jam or preserves
2 tablespoons fine sanding sugar
1/8 teaspoon ground cinnamon
- Preheat oven to 375. Whisk together flour, salt, and baking soda.
- Beat butter and granulated sugar with a mixer on medium-high speed until pale and fluffy, about 4 minutes. Reduce speed to low. Beat in egg and vanilla. Add flour mixture, and beat until just combined. Add peaches and jam, and beat until just combined.
- Using a 1 1/2-inch ice cream scoop or a tablespoon, drop dough onto baking sheets lined with parchment, spacing about 2 inches apart. (If not baking all of the cookies at once, refrigerate dough between batches; dough can be refrigerated in an airtight container for up to 2 days.) Combine sanding sugar and cinnamon. Sprinkle each cookie with 1/8 teaspoon cinnamon-sugar mixture.
- Bake cookies, rotating sheets halfway through, until golden brown and just set, 11 to 13 minutes. Let cool on sheets for 5 minutes, and then transfer cookies to wire racks to cool completely.
Monday, June 02, 2008
Kitchen Filler
Right now I've only got one pic of food ready to post, but I don't have the recipe with me. And lots of stuff on my camera waiting to be uploaded. So here's a little filler post until I can get my stuff together. :) A couple weeks ago, inspired by this post on Black Eiffel, I used my Friday off to clean out and tidy my kitchen pantry, refrigerator and freezer.
Pantry In my pantry I try to make the best use of the space that I have. On some shelves I make use of the space at the back that I wouldn't be able to reach easily by keeping extraneous items like my pewter salad bowl, popcorn popper, cookie cutter tin- things I need on rare occasions. Top shelf is carbs- rices, pastas, panko and breadcrumbs. Bottom shelf of the upper cabinet is canned goods- beans, various tomato products, tuna, peanut butter, a few canned veggies. There are three shelves in the lower cabinet. The top is baking supplies- white whole wheat, all purpose, and cake flour, cornmeal, vegetable and canola oil, two types of molasses, vinegar, and baking powder. All sorts of mix-ins tucked under that little riser too- chocolate and peanut butter chips, coconut, walnuts, pecans, and almonds. Middle shelf holds bread and crackers, and some oats in the back too. And the bottom shelf which isn't really visible holds our chips and cereal- typically tortilla, pretzels, and generic honey & oat clusters.
Freezer Not much to look at here- fruit bars, ice cream sandwiches (which no longer exist), eggplant bolognese in the plastic, pan of vegetable enchiladas, trout fillets from the pop-in-law, and a couple boxes of frozen junk food.
Refrigerator Well, this picture was taken before the weekend shopping trip, so it looks a lot more sparse than it normally is. What is normally in our fridge after a trip to the stores? A lot of cheese- shredded mozzarella and crumbled feta for pizzas, shredded cheddar, a block of cheddar, and a block of pepper jack. Those are pretty much always in there. Spinach, mixture of lettuces, celery, carrots, zucchini, squash, onions, and green bell peppers for salads, pizzas, and cooking. Apples and grapes, hummus and pitas, salted and unsalted butter, eggs, and our Brita water dispenser. No more cow's milk, unless I need it for baking. We've moved on to soy milk. The door is just chocked full of condiments- yellow, dijon and spicy-hot mustards, ketchup, preserves, salad dressings, Josh's coffee creamer, jars of olives, cherries, and minced garlic, wheat germ, and that weird powdery grated parmesan that Josh loves.


