Showing posts with label harvest month. Show all posts

Monday, November 30, 2009

Harvest Month- Cumin Polenta Stuffed Poblanos

Here it is, the last day of November and my final Harvest Month recipe to share. This has been a fun experiment! The idea for this meal was sparked by a recipe I spotted while perusing a Better Homes & Gardens issue I inherited on a visit to Josh's grandmother. I've obviously used corn meal before, and used pre-made polenta, but never made my own. The recipe for Cumin Polenta called out to me and I almost immediately thought about filling some poblanos with it. A quick click using the Food Blog Search in my sidebar brought me Cara's Pumpkin Polenta & Manchego Stuffed Poblanos which helped fill in the rest of the picture the Cumin Polenta had started to form in my mind. I stuffed my peppers with the BHG polenta recipe, topped with Pepper Jack cheese, and followed Cara's lead by serving them over a black bean/tomato/chile ragout. Making this polenta wasn't nearly as hard as I thought it might be, and I'll definitely be trying some different recipes for it in the future.

Cumin Polenta Stuffed Poblanos
Serves 4


4 large poblano peppers
1 14 oz. cans reduced sodium chicken broth
2 teaspoon ground cumin
1 cup yellow cornmeal
1/2 cup whole milk
1 tablespoon butter
1/4 cup diced yellow onion
1 clove minced garlic
1 15 oz. can black beans, drained and rinsed
1 10 oz. can diced tomatoes with green chilies
1/2 cup grated Pepper Jack cheese

  • Roast whole poblanos by your preferred method- stove, oven, grill, etc. I used the oven, and roast just long enough to soften, but not long enough to have to peel them.
  • Meanwhile, in a large heavy saucepan combine broth and cumin; bring to a boil. Reduce heat; gradually whisk in cornmeal. Cook and stir until thick, about 6 to 8 minutes. Whisk in milk and butter. Season with salt and pepper.
  • Preheat oven to 375 degrees. Spray an oven-proof skillet with lid with nonstick cooking spray and heat over medium-low heat. Cook the onions until soft, about 8 minutes. Add the garlic and cook 1 minute more. Add the diced peppers with green chilies and the black beans, bring to a boil, then reduce heat and simmer.
  • Carefully cut a slit into each pepper and scoop out all the seeds. Fill each pepper with polenta and place on top of the black bean mixture. Top each pepper with shredded cheese and cover the skillet. Bake for about 15-20 minutes.
My notes: This polenta doesn't really firm up enough to not escape from the poblanos, so next time I might not roast the peppers beforehand and instead just cut them in half and fill. And I realize my pepper-roasting instructions are a little vague- for the life of me I can't actually remember what I did. I mean, I know I roasted them in the oven, but I can't remember what temp or for how long. I really shouldn't wait so long to share recipes- this is what happens!

Wednesday, November 25, 2009

Harvest Month- Mushroom Risotto

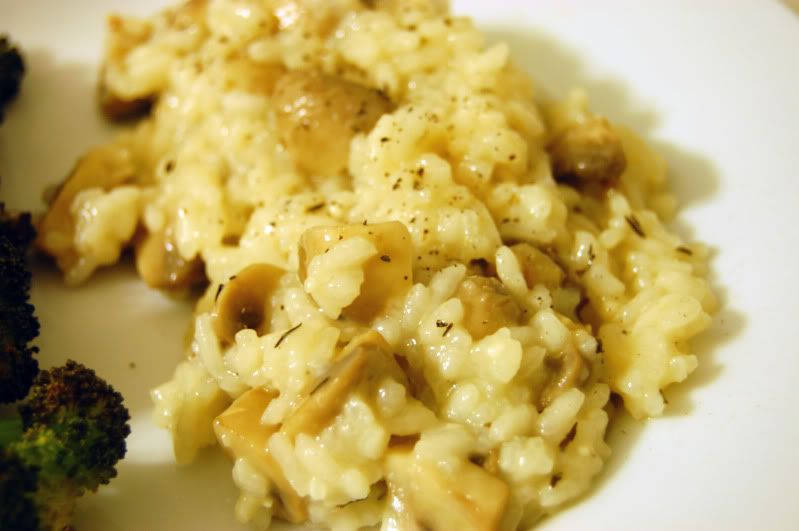
Trying to chose my third recipe for Harvest Month proved a little harder than the two previous attempts. I was having trouble narrowing it down to a choice and finding something that would really appeal to me. After noticing that mushrooms were on sale that week I started thinking about what I could make with them, figuring I'd decide on a grain recipe later. And then I came across this recipe from the April 2009 issue of Everyday Food. I'd never made a risotto before, and never cooked with a rice other than your typical long grain white or brown. Seemed like a good opportunity to try out Arborio rice and use some yummy, and cheap, mushrooms. This recipe was super easy for me, especially since it's not the usual risotto. This dish is prepared in the microwave, making it a cinch for weeknight meals when time is short and you need to be able to do things other than stand at the stove and baby-sit your dinner. And it's a good thing I liked it because Arborio rice ain't cheap. I look forward to trying out a "real" risotto soon, but this will do in a pinch.

Mushroom Risotto
Recipe from Everyday Food: Serves 4


2 tablespoons butter
1/2 teaspoon dried thyme
10 ounces button mushrooms, trimmed and quartered
Coarse salt and ground pepper
1 cup Arborio or long-grain rice
1 can (14.5 ounces) reduced-sodium chicken broth
3 garlic cloves, sliced
1/4 cup grated Parmesan

  • In a deep, 9-inch microwave-safe dish with a tight-fitting lid, combine butter and thyme. Microwave until butter has melted and thyme is fragrant, about 1 minute. Add mushrooms, and season with salt and pepper. Microwave until mushrooms have released their liquid, about 8 minutes. Transfer to a plate.
  • In the same dish, combine rice, broth, and garlic; season with salt and pepper. Cover, and microwave 9 minutes. Stir in 2 cups water, and microwave until rice is tender, 9 minutes more.
  • Stir in mushroom mixture; microwave until risotto is heated through, about 2 minutes. Stir in Parmesan. (If risotto is too thick, add water as needed.)
My notes: Based on online recipe reviews I only added one cup of water, as opposed to two, and it came out great. For a nice vegetarian dinner I served the risotto with a side salad and some roasted broccoli.

Tuesday, November 10, 2009

Harvest Month- Bulgur Salad

Here's the second recipe I tried out for Harvest Month here at Small Time Cooks. Bulgur was the next grain I was interested in trying out, but I wasn't sure what kind of recipe I should go with. Naturally, I turned to my stand-by source, Everyday Food. I found this recipe for Bulgur Salad and decided it would probably be a pleasant side for some grilled fish. And it was pleasant enough. It wasn't really standout, but it was good. I might make it again, but I think I'll probably find another recipe to try out for the rest of the bulgur in my pantry. I'll be having the leftover salad for lunch, sprinkled with some feta. Cause feta makes everything better, right? That's the other thing- even though I halved this recipe for 4, I still had a lot of salad. Not sure what their idea of a serving size is for this, I know I had at least a cup at dinner.

Bulgur Salad
Recipe from Everyday Food; Serves 4


5 1/4 ounces dried bulgur (1 cup)
1 cucumber, peeled, seeded, and finely chopped
1 small red onion, finely diced
1 cup (packed) chopped fresh flat-leaf parsley
1 clove garlic, minced
3 tablespoons fresh lemon juice
1 tablespoon olive oil
Coarse salt and ground pepper

  • In a large bowl, pour 1 cup boiling water over the bulgur. Cover with plastic wrap; let stand until water is absorbed, about 30 minutes.
  • Add cucumber, onion, parsley, garlic, lemon juice, oil, 1/2 teaspoon salt, and 1/4 teaspoon pepper; toss to combine. Serve warm, cold, or at room temperature. (To chill, cool, then refrigerate in an airtight container for up to 1 day.)
My notes: I'm sure my cuke and onion weren't chopped/diced small enough, but I tend to be lazy when it comes to dishes where size won't affect a cooking time. And I didn't peel my cucumber, because I hate to turn down and opportunity for more fiber.

Tuesday, November 03, 2009

Harvest Month- Greek-Style Quinoa Burgers

I have had very little experience in cooking with the great variety of grains available for your pantry shelves. So a few weeks ago, while thinking about the next challenge I might present to myself once my self-imposed grocery budget was lifted, I thought that the fall season would be the perfect time to try out some of these different grains. Fall, harvest, grains- you get it. So, my goal for the month of November is to try one recipe a week that utilizes a grain that I have never cooked with before. And with that in mind I went searching for my first recipe while meal planning this weekend. I rather quickly found this recipe, which is from Martha Stewart's wholeliving . I recently had a more or less failed attempt at making baked falafel, so this recipe seemed like a good challenge in a slightly similar vein. And I had a much more successful attempt with this one. These came out so deliciously! They were also very easy to make and despite my concern that the burgers would not stay together through cooking I had no problems once I chilled them as the recipe suggested. Highly recommend these as a very filling vegetarian meal option. Quinoa is the member of the grain group with the highest amount of protein, so combined with the beans and an egg you definitely don't feel like you've missed out on anything during your meatless meal.

Greek-Style Quinoa Burgers
Recipe from Martha Stewart's wholeliving; Serves 4


1/2 cup rinsed quinoa
1 medium carrot, cut in large chunks
6 scallions, thinly sliced
15 oz. great northern beans, drained and rinsed
1/4 cup plain dried breadcrumbs
1 large egg, lightly beaten
1 tablespoon ground cumin
Coarse salt
Ground pepper
2 tablespoons olive oil
1/2 cup plain nonfat Greek yogurt
1 tablespoon fresh lemon juice
4 pitas (each 6 inches)
1/2 English cucumber, thinly sliced diagonally

  • In a small saucepan, bring 3/4 cup water to a boil; add quinoa, cover, and reduce heat to low. Cook until liquid is absorbed, 12 to 14 minutes; set aside.
  • In a food processor, pulse carrot until finely chopped. Add cooked quinoa, half the scallions, beans, breadcrumbs, egg, cumin, 1 teaspoon salt, and 1/4 teaspoon pepper; pulse until combined but still slightly chunky.
  • Form mixture into four 3/4-inch-thick paties (dip hands in water to prevent sticking). If too soft, refrigerate 10 minutes to firm. In a large nonstick skillet, heat oil over medium; cook burgers until browned and cooked through, 8 to 10 minutes per side.
  • Meanwhile, in a small bowl, combine yogurt, lemon juice, and the remaining scallions; season with salt and pepper. Serve burgers in pita topped with cucumber and yogurt sauce.
My notes: I served this with a hastily thrown together greek salad, using some of the cucumber, a 1/4 of a red onion I had in the fridge, two seeded tomatoes, juice of half a lemon, drizzle of olive oil and a sprinkling of feta. Oh boy, I love Greek salad- even a hasty one! The tart dressing and salad, and salty feta were good compliments to the slightly spicy burgers. Wetting your hands when forming the patties and refrigerating them are both key, in my opinion, to getting these burgers ready for the pan. I definitely look forward to making these again.

Related Posts with Thumbnails