Showing posts with label corn. Show all posts

Thursday, September 16, 2010

Last Spoonful of Summer- Fresh Corn Spoon Bread

I've been really off the ball in taking advantage of summer produce. This summer seemed just so hot, and so endless. Sure there's a wonderful produce bounty, but just thinking about cooking seemed like hard work in 110 degree temperatures. So I decided I'd better take a stab at something summery before the heat has completely passed me by. When it came time to choose I went with this Fresh Corn Spoon Bread from the September issue of Everyday Food. I felt brave for choosing it, since it required several different steps. And let's face, lately the many steps I've been taking in the kitchen have been from the freezer to the microwave with another burrito. Sad, but true. I decided I'd serve this with some grilled fish and I had some fresh tomato, sliced into wedges with a sprinkling of salt and pepper on the side. Josh passed on the tomato, generally only likes them in a cooked form. However, he loved the spoon bread. He was shocked when I told him it didn't have any cheese in it. He kept referring to it as corn souffle. Eventually I stopped correcting him, and let him go ahead and think I'm a fancier cook than I am.

Fresh Corn Spoon Bread
Recipe from Everyday Food; Serves 6
Fresh Corn Spoon Bread

2 tablespoons unsalted butter, plus more for baking dish
1/2 small yellow onion, diced small (1/2 cup)
1 jalapeno, diced small
Coarse salt and ground pepper
2 cups whole milk
2 cups frozen corn kernels, thawed
1/2 cup yellow cornmeal
4 large eggs, yolks and whites separated
  • Preheat oven to 375 degrees. Butter an 8-inch square baking dish. In a medium pot, melt butter over medium-high. Add onion and jalapeno and season with salt and pepper. Cook until onion is soft, about 5 minutes. Add milk and corn and cook until milk is very hot but not bubbling, about 3 minutes. Whisk in cornmeal and cook, whisking constantly, until mixture is thick, about 2 minutes. Remove from heat and let cool 10 minutes. Whisk in egg yolks.
  • In a large bowl, whisk egg whites until soft peaks form. Fold into corn mixture, then pour into baking dish. Bake spoon bread until browned on top and set in middle, 30 to 35 minutes, rotating dish halfway through. Let cool 5 minutes before serving.
My notes: I used fresh corn, cut from three ears. I didn't really measure, I just figured if two ears usually gives me 1-1.5 cups that three should do the trick. It did taste really good, but I think I could have been a little heavier-handed with the salt & pepper, and my jalapeno seemed to be fairly mild. Would have been nicer with just a little more kick to it. And, I may have slightly over-beaten my egg whites, so keep a close eye. I had to do a little more mixing than folding to weaken them a bit and get things to meld a little better.

Friday, July 30, 2010

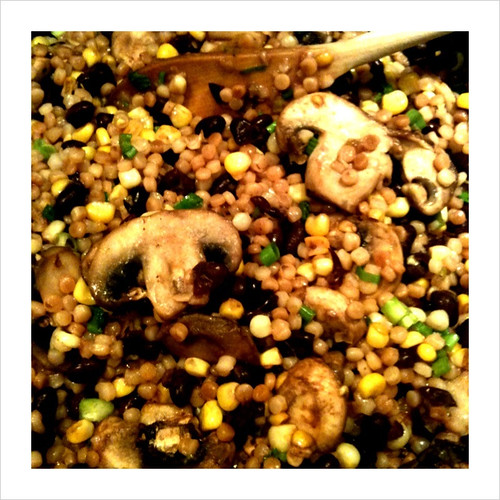
Pleasantly Surprised- Couscous with Black Beans, Corn, and Mushrooms

I figured I had better make a new recipe this week so I'd actually have something put up here. And I am always looking to add some more vegetarian recipes to my repertoire. I went to my usual source, Everyday Food, and noticed this dinner suggestion. It seemed easy enough, and though a little apprehensive about it I figured I'd give it a shot. When I got home Monday night, honestly, the last thing I felt like doing was making a new recipe. I'd have much rather called in a pizza, or tossed a burrito in the microwave. But, I decided to be a big girl and get to work. Especially since I had so many fresh ingredients for the dinner that I didn't want to go to waste. It was my first time cutting corn off the cob- that was a little messy. But overall everything else came together pretty well. And as often turns out to be the case, the recipes I am hesitant about turn out to be the ones I like the most. This had a really great flavor and was really filling. The textures were really nice together. Josh liked it a lot too. He thought it tasted like veggie fried rice. Good to know I can get that flavor without having to twice cook some rice!

Couscous with Black Beans, Corn, and Mushrooms
Recipe from Everyday Food; Serves 4
Coucous with black beans, corn, and mushrooms
2 tablespoons extra virgin olive oil
1 cup Israeli couscous (you can substitute regular couscous or orzo pasta)
course salt and ground pepper
1/2 lb. sliced button or cremini mushrooms
1 small bunch scallions, white and green parts separated and thinly sliced
1 1/4 cups fresh corn kernels (from 2 ears of corn)
1 can (15.5 oz) black beans, rinsed and drained
2 tablespoon fresh lime juice
1 jalapeno, thinly sliced (optional)
1 avocado, halved, pitted, peeled, and sliced

  • In a medium saucepan, heat 1 tbsp oil over medium-high heat. Add couscous and cook, stirring constantly, until golden brown and fragrant, about 4 minutes.
  • Add 1 1/2 cups water, season with salt, and bring got a boil. Reduce heat to low, cover, and simmer until liquid is absorbed and couscous is tender, about 15 minutes.
  • Meanwhile, in a large skillet, heat 2 tsp oil over medium-high heat. Cook mushrooms, stirring occasionally, until golden brown, about 5 minutes. Season with salt and pepper and then transfer to a large bowl.
  • Add 1 tsp oil to the skillet and cook the scallion whites and corn, stirring occasionally, until scallions are soft and corn is browned, about 5 minutes. Season with salt and pepper and then add to the mushrooms.
  • Add couscous, black beans, lime juice, jalapeno (if using), and scallion greens to the mushroom mixture and toss to combine. Season with salt and pepper and serve with avocado slices on top.
My notes: I did not use the optional jalapeno, but others who have shared this recipe online said that they used it and really liked it, so maybe next time I'll give it a shot. Although you can't see it in my photo we did have the avocado with it, and it really did add a lot of complimentary flavor to the dish. I'm tagging this recipe vegan, but is someone knows something about Israeli couscous that I don't, let me know and I'll remove the tag.

Monday, August 10, 2009

Black-Eyed Pea Tacos

Does that sound odd to you? I know that Josh was definitely apprehensive when I told him what we'd be having for dinner the day this recipe was on the agenda. And to be honest I had been a bit skeptical myself. This recipe had been on my to-cook list for about two years, in part because every time it caught my eye I just thought that I wasn't feeling that...experimental. Of course, I probably should have known better because it is after all an Everyday Food recipe. Considering I cook almost exclusively from that branch of Martha's tree, why I was concerned it wouldn't work out I just don't know. But lately I've been more and more furtive in my search for vegetarian recipes to try. My list of recipes to try is increasingly populated with chicken and beef meals, awaiting to be crossed off due to the cut back in our meat purchasing. So, with the vegetarian recipes on the list dwindling each week I finally decided to give this one a go. We are no longer apprehensive. These tacos were really, really good. I mean, Josh told me several times that they were good. That's a big accomplishment for a meal, as half the time I have to ask him if he liked dinner. He assumes that I just know he likes what I make for him, but I like to hear him say it. This time his approval was loud and clear. :)

Black-Eyed Pea Tacos
Recipe from Everyday Food; Serves 4


2 tablespoons vegetable oil
1 medium onion, finely chopped
4 cloves garlic, minced
1 jalapeno chile, seeded and ribbed, minced
Coarse salt and ground pepper
2 15.5 oz. cans black-eyed peas, drained and rinsed
1 10 oz. package frozen corn
1/2 cup chopped fresh cilantro
12 (6-inch) corn tortillas, heated
4 ounces soft goat cheese, crumbled shredded lettuce, salsa, and sliced radishes, for garnish (optional)

  • Heat oil in a large skillet over medium heat. Add onion, garlic, and jalapeno; season with salt and pepper. Cook, stirring often, until softened, 5 to 7 minutes.
  • Add peas, corn, and 2 cups water. Simmer over medium-high heat until corn is tender and most liquid has evaporated, 12 to 15 minutes. Stir in cilantro; season again with salt and pepper. Remove from heat.
  • To serve, fill heated tortillas with black-eyed pea mixture, goat cheese, and garnishes, as desired.
My notes: I halved this recipe to just make enough for the two of us. I served them with fresh salsa and a little feta on top, and cilantro-lime rice on the side.

Wednesday, July 01, 2009

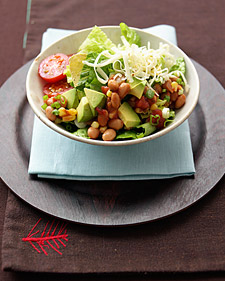
No Heat Week Part 3- Bean, Corn, and Tortilla Salad

This isn't the first time I'm sharing this recipe, but it makes repeated appearances in our kitchen. Thanks to it's beloved status in our hearts and stomachs it was a natural choice for our week of cooking as little as possible. This recipe does involve some heating, but it's all via the microwave which results in minimal heat created in the house and makes for a speedy meal too. And this salad is easily adapted to what you have on hand, as I'll share post-recipe. I didn't take a snapshot of dinner, so this picture is via Martha Stewart.

Bean, Corn, and Tortilla Salad
Recipe from Everyday Food; Serves 4


1 can (15.5 ounces) pinto beans, drained and rinsed
1 package (10 ounces) frozen corn kernels (2 cups)
1/4 cup prepared medium tomato salsa, plus more for serving
1 bunch scallions, thinly sliced (1 cup)
1 ripe avocado, peeled, pitted, and cubed
3 plum tomatoes, thickly sliced
Coarse salt and ground pepper
1 (12 ounces) romaine hearts, cut into bite-size pieces
3 cups (3 ounces) broken baked tortilla chips
3/4 cup coarsely grated pepper Jack cheese

  • In a medium microwave-safe bowl, combine beans, corn, and salsa. Microwave just until warmed through, 1 minute. Stir in scallions, avocado, and tomatoes; season with salt and pepper. Set bean mixture aside.
  • In a large bowl, toss lettuce and chips together. Divide evenly among plates; top with bean mixture and cheese. Serve immediately, topped with additional salsa, if desired.
My notes: After the two previous salads I was out of tomatoes, so I used some red and yellow bell peppers to add more color and crunch to the salad. You could use black beans or kidney beans instead of pinto, or even a mixture of two or more. Substitute red onion for scallions, perhaps Monterrey or Cheddar for the Pepper Jack. Or even queso fresco or blanco, both traditional Mexican cheeses. What do you have on hand? Because it will probably work with this salad.

Monday, June 09, 2008

Picnic Eats


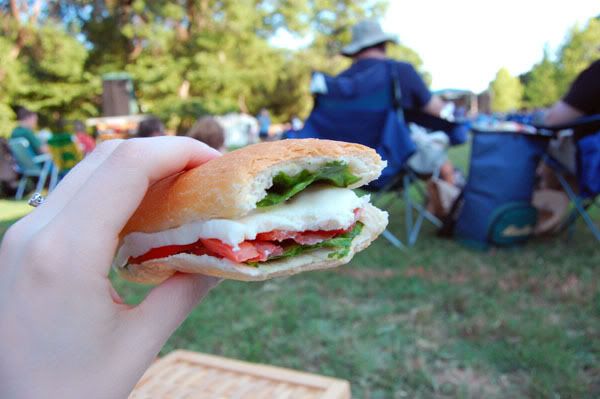
We certainly didn't sustain ourselves on cookies alone, so here's some info on the rest of our picnic dinner from last weekend. I tried to make things nice and summery, but also not too difficult or messy. The best idea for planning a meal away from your kitchen, or any meal for entertaining really, is to combine ready-to-eat items with homemade recipes. And ready-to-eat doesn't have to mean anything heavily processed. Our meal consisted of Caprese sandwiches, roasted corn on the cob, garlic-rosemary baked chips and fresh fruit. Fruit didn't need anything other than a good rinse and it was ready to go. The chips came in a resealable bag making them great for outdoor eating and travel. There's half our meal taken care of in no time flat, leaving me time to make those delicious cookies we had for dessert. Roasting the corn was also pretty quick and easy. The Caprese sandwiches are my current favorite- so good. Might want to put this recipe off until the tomato scare is over, but when it is I'll be making more for sure. Overall it was picnic perfect!

Caprese Sandwiches
Serves 4


1 fresh baguette
1 bunch fresh basil
2 roma tomatoes, seeded and thinly sliced lengthwise
8 oz. fresh mozzarella, thinly sliced
Olive oil
Coarse salt and ground pepper

  • Slice the baguette crosswise into 4 pieces as evenly as possible. Slice each piece in half lengthwise. Brush each slice lightly with olive oil; season lightly with salt and pepper.
  • Starting with the bottom slice of baguette, layer fresh basil leaves, tomato slices, and mozzarella. Top with additional basil leaves and second baguette slice.
  • To pack for picnic: press sandwich together and wrap tightly with plastic wrap or wax paper. Secure with twine or tape. Store in cooler, in freezer bag if necessary to protect from too much moisture.
Roasted Corn


As many ears of corn as you'd like to prepare
Butter
Coarse salt and ground pepper
  • Preheat oven to 375 degrees. Pull back corn husks and remove silks from the ears. Brush corn with butter and season with salt and pepper. Pull husks back up over corn and secure with kitchen twine.
  • Roast corn on a baking sheet for 25 minutes, turning over once.
  • To pack for picnic: allow to cool some before wrapping with wax paper and securing with twine. Pack in picnic basket.
I went the simple route so as not to compete with the basil in the sandwiches, but you could also try a flavored butter with the corn- Corn with Cheesy Butter, Herb Butter, Grilled Corn with Seasoned Butter

Thursday, August 30, 2007

Tacos for me, Tacos for you

Well, last night's dinner didn't happen. I realized I had forgotten an ingredient, and then the more I thought about it the less I felt up to making a mess in the kitchen. So I made a sandwich instead. In thinking of how I would have liked to have something to post today I remembered that I never wrote about the dinner that Steph and I made together a while back. We created quite a feast, but my main contribution was the recipe for the Shrimp & Corn Tacos. This recipe is super yummy, and of course is from my favorite source of inspiration, Martha Stewart.

Shrimp & Corn Tacos
Recipe from Martha Stewart; Serves 4
2 tablespoons vegetable oil
1/2 medium onion, finely chopped
1 jalapeno, (seeds and ribs removed, for less heat), minced
2 garlic cloves, minced
Coarse salt and ground pepper
2 plum tomatoes, chopped
1 10 oz. frozen corn kernels, unthawed
1/2 lb. large peeled and deveined shrimp, cut into 1/2" pieces
12 6" corn tortillas, heated according to package instructions
2 cups shredded cabbage
1/2 cup green or red salsa
1/2 cup sour cream
Lime wedges, for serving

  • Heat oil in a large skillet over medium-high. Add onion, jalapeƱo, and garlic; season with salt and pepper. Cook, stirring occasionally, until onions are softened, 4 to 5 minutes.
  • Add tomatoes and corn; cook, stirring occasionally, until corn is heated through and tomatoes are soft, 4 to 5 minutes.
  • Add shrimp and cook, stirring occasionally, until opaque throughout, 2 to 3 minutes. Serve immediately with tortillas, cabbage, salsa, sour cream, and lime wedges.
My Notes: I often like to take the easy way out (as you may have noticed by now), so I often will use 1/2 lb. of the small salad shrimp you can buy in the freezer section. They are already the perfect size so it saves me some time. Also, I've yet to be convinced that I need cabbage on my tacos. We typically just toss some cheese and salsa on. In the picture you might notice some guacamole which is also delicious as a topping. We served our tacos with some spicy black beans, lime & cilantro rice and sipped on some sangria with our dinner.

Thursday, June 07, 2007

Real Simple?

Last night I was planning on making a recipe from my latest issue of Real Simple. I honestly didn't think this recipe would be that hard, but then again I didn't take my total lack of motor skills or mental concentration into account. I really am not that great at multi-step cooking. Now I'm sure you're wondering to yourself, "Aside from toast, doesn't most cooking require more than one step?" And yeah, you'd be right. But the fact remains that since this recipe required me to put things in a skillet, remove them, add more things in the skillet, move to oven, and then back to the skillet with more ingredients that I should probably have realized I would be doomed. The outcome tasted good, but if you think that it looked anything like the picture below, you are sadly mistaken. I would recommend this recipe if, you know, you're not task-handicapped like me.

Sauteed Chicken With Corn and Edamame
Recipe from Real Simple; Serves 4
4 ounces sliced bacon
1 tablespoon olive oil
4 6-ounce boneless skinless chicken breasts
3/4 teaspoon kosher salt
1/2 teaspoon black pepper
1 large red onion, thinly sliced
2 cups frozen shelled edamame, thawed
1 1/2 cups corn kernels, fresh (2 ears) or frozen

  • Preheat oven to 400 degrees.
  • In a large skillet, over medium heat, fry the bacon until crisp, about 6 minutes. Transfer to a paper towel-lined plate. Discard the drippings. Wipe out the skillet and heat the oil over medium-high heat.
  • Season the chicken with 1/2 teaspoon salt and 1/4 teaspoon pepper. Cook until golden brown, about 3 minutes per side. Transfer to a baking dish and roast until cooked through, about 8 minutes.
  • Meanwhile, add the onion to the skillet and cook, stirring occasionally, until soft, about 8 minutes. Add the edamame and corn and cook, stirring occasionally, until heated through, 2 to 3 minutes. Break the bacon into pieces and add them to the skillet. Stir in the remaining salt and pepper. Spoon onto individual plates and serve with the chicken.
My notes: Most of the problems with this recipe were my fault. My chicken breasts were definitely larger than 6 ounces, but I'm kind of limited to what I can find and afford at my small grocery store. So, I had to bake them for longer than 8 minutes. Much longer. Which then threw off the onion mixture. Also, I can never, ever get bacon to cook crisply in a skillet. After 6 minutes I had 3 soft pieces of cooked bacon. I threw it in the oven with the chicken, and it got a bit crisper. I tore it into bits, which allowed me to only use the meaty portions of the bacon, eliminating at least some of the fat. From now on I refuse to cook bacon any way other than in an oven. Also, since my chicken breasts were really big, I just cut them into big chunks and mixed them in with the bacon and veggie/bean mixture. This meal was pretty good, actually, but not worth the amount of time and effort it took me to complete it. Josh for some reason, despite being a man, didn't like the smokiness of the bacon with everything else. Real Simple mentions you could go sans bacon to cut the fat, and apparently Josh would support that suggestion. Another note- try to remember when you've just taken a dish out of a 400 degree oven. Luckily I let go of it quickly enough that I barely burned my fingers.

Related Posts with Thumbnails