I know I've been neglecting this little blog for a few weeks. And if you read back over the past year or so, you'll start to see a pattern. I wander off, then stumble back and say I'll do better. For quite a while I've been wanting to give this little place a face lift, but I had been hesitant to dive into the deep end of coding and whatnot. This week though I decided I needed to make it a priority and set today aside to get this task crossed off my to-do list. After several hours spent intimately with Photoshop and Blogger, this is the result. New color scheme, new font, and a new header. I've created handy buttons featured on the left to make it easier to find some of the most popular types of recipes. And a new page button, which I'm happy to share with everyone. Feel free to grab the code and spread the word. Hopefully the new Small Time Cooks is a little easier to read and a little more pleasant to look at. And hopefully I'll keep up with it much more often now.
P.S. If you're reading this through an RSS feed I hope you'll click through to see all the hard work I've done. And if you're not, well then I hope you'll consider subscribing. :)
Saturday, September 11, 2010
Clearing The Table, So To Speak

Friday, July 16, 2010
Mad Hungry- Arrabiata Sauce
I was looking for some yummy vegetarian recipes for this week's menu when I decided to check over my half-forgotten "To-Cook" list. Most of the recipes left to try are meaty, which I'm not opposed to, but haven't really been in search of lately. However, the entry "Arrabiata Sauce" remained unchecked and I decided that it was finally time to cross it off. I snatched this recipe from Poco-Cocoa long ago. And then proceeded to not make it until now. But now that I have I will definitely be making it again. I still have a little left in the fridge, which I can't wait to reheat because when I made this earlier in the week I was dealing with some sinus stuff and I don't think I was capable of taking in the full flavor. But, even with sinuses, I could tell that it was good stuff, spicy stuff. I followed Crystal's tips for making it and it came out great.
Arrabiata Sauce
Recipe from Poco-Cocoa; Makes 3 cups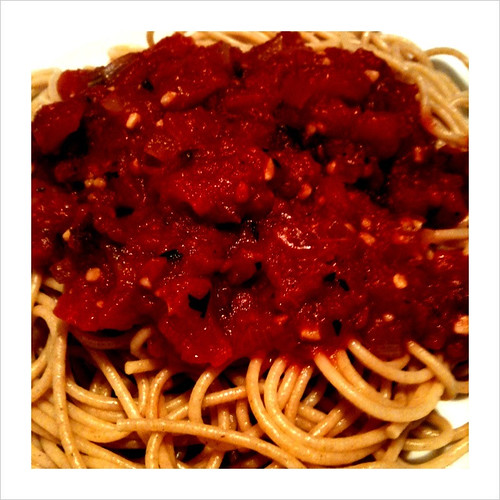
1 teaspoon olive oil
1 cup chopped onion
4 garlic cloves, minced
1/2 cup dry red wine or 2 tablespoons balsamic vinegar
1 tablespoon sugar
1 tablespoon chopped fresh or 1 teaspoon dried basil
1 teaspoon dried crushed red pepper
2 tablespoons tomato paste
1 tablespoon lemon juice
1/2 teaspoon dried Italian seasoning
1/4 teaspoon black pepper
2 (14.5-ounce) cans diced tomatoes, undrained
2 tablespoons chopped fresh parsley
- Heat oil in a saucepan or large skillet over medium-high heat. Add onion and garlic; saute 5 minutes. Stir in wine and next 8 ingredients; bring to a boil. Reduce heat to medium, and cook, uncovered, about 15 minutes. Stir in parsley.
Tuesday, December 22, 2009
Butternut Squash & Chipotle Soup
EDIT: NOW WITH PHOTO! Well, I forgot once again to upload the photo for this recipe, but I thought I'd go ahead and get this post up and add the pic when I get home tonight. I've got a lot on my holiday plate this week, and if I wait until I get home to do the whole thing then it just won't get done! This recipe is an adaptation of the Sweet Potato & Chipotle Soup from the December issue of Everyday Food. Tracy at Shutterbean recently gave it try, and subsequently two thumbs up. I thought this might be a great recipe to adapt so I could use the other half of the butternut squash I'd bought. This was my first attempt at making a squash soup and gladly it came together quite easily. That also meant it was my first time to eat a squash soup, Josh's too. It was really good, I was impressed. That said, it's a cup kind of soup for me, not a bowl. I can't eat too much of it in a sitting before I'm longing for a bit more texture. But it was good, and I would definitely use it as a first course in the future.
Butternut Squash and Chipotle Soup
Adapted from Everyday Food; Serves 4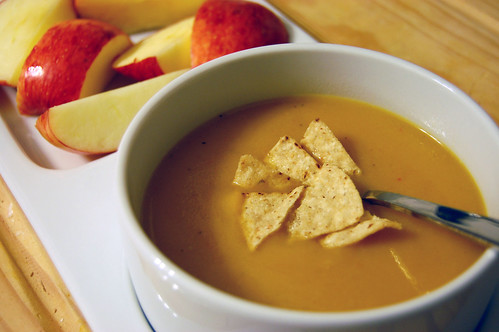
1 tablespoons olive oil
1/2 medium white onion, chopped
coarse salt & ground pepper
1 teaspoons ground cumin
1 lb. butternut squash, peeled and cut into 1 inch pieces
1 cloves garlic, minced
1/2 whole chipotle chili in adobo, chopped
3.5 cups of low sodium chicken broth
Tortilla chips, for serving
- In a large Dutch oven or heavy pot, heat 1 tablespoon oil over medium high heat. Add onion, season with salt and pepper, and cook until beginning to brown around the edges, about 5 mins. Add cumin & garlic and cook, stirring until fragrant, about 1 min. Stir in squash, chile, and broth. Bring to a boil; reduce to a rapid simmer, partially cover and cook until sweet potatoes can be mashed easily with a spoon, 20 to 25 mins.
- Let soup cool slightly. Using an immersion blender, or a blender working in batches, puree the soup. Season with salt & pepper and serve.
Monday, May 25, 2009
Roasted Broccoli
Happy Memorial Day. I wanted to make sure I got one more post up before we leave for our vacation tomorrow morning. This is a fantastic recipe I stumbled across while looking for a way to use up some leftover broccoli. It is an Ina Garten recipe, so you know that it is good, that I found by way of The Amateur Gourmet. He was practically shouting from the rooftops about this broccoli, so I figured it was definitely worth a shot. I made this as an accompaniment to some grilled trout, caught fresh by my father-in-law, along with some rosemary roasted potatoes. This was one heck of a weeknight meal- super simple, but really enjoyable. Josh went on and on about the broccoli, mentioning to people days later. We both liked it so much I made it again the following week. This is definitely a keeper.
Roasted Broccoli
Recipe from Ina Garten via Amateur Gourmet
4 to 5 pounds of broccoli, washed and thoroughly dried, cut into florets
5 tablespoons olive oil, plus 1.5 tablespoons more
1 1/2 teaspoons kosher salt
1/2 teaspoon fresh ground pepper
4 garlic cloves, peeled and sliced
Zest and juice of 1 lemon
3 tablespoons toasted pine nuts
1/3 cup freshly grated Parmesan cheese
2 tablespoons julienned fresh basil
- Preheat oven to 425 degrees.
- On a baking sheet, toss broccoli with olive oil, salt and pepper. Add garlic and toss again.
- Roast for 20-25 minutes, until tips of some florets are starting to brown.
- Add the lemon zest, lemon juice, additional olive oil, pine nuts, parmesan cheese and basil. Toss and serve.
Monday, March 30, 2009
Soon, I Hope
If you'd be so kind to take a gander to the right, you'll see that I have once again listed a menu for the week. Things are far from being "normal" around here, but I'm starting back to cooking with some of the easiest recipes from my repertoire. Then it should be just a hop, skip and a jump to getting to all the stuff on my to-cook list, meaning I'll finally have some new things to share. Slowly, but surely, I'll get there. Also, we don't yet have interwebs at the house, so we gotta fix that too, ha.
Thursday, July 10, 2008
Still Peachy: Whole-Wheat Peach Muffins with Pecan Crumble Topping
This weekend I went on a bit of a produce binge. But what better time of the year, right? We got our usual fruit staples- apples and bananas, but accompanying those home from the store were grapes, cherries, watermelon, lemons, limes and peaches. Blueberries were supposed to be on that list. I hadn't made blueberry muffins in a long time and thought they would be a great weekend treat. Apparently, since blueberries were on sale, everyone else thought so too and beat me to them. Undaunted, I grabbed the peaches instead and decided to figure out what to do with them later. So Sunday morning when I woke up I went in search of a muffin idea. I went straight to Everybody Likes Sandwiches. I've been getting lots of recipes and ideas from her lately, and I knew I'd find something great to start from. I landed on her recipe for Blackberry Muffins with Crumble Topping and decided it was just the thing. And with a few minor changes I had some really awesome muffins coming out of my oven!
Whole-Wheat Peach Muffins with Pecan Crumble Topping
Adapted from Everybody Likes Sandwiches; Makes 12-16
Batter:
2 cups white whole-wheat flour
2 teaspoons baking powder
1/2 teaspoon baking soda
1/2 teaspoon salt
1/2 cup sugar
2 eggs
1 cup vanilla or plain yogurt
1/2 cup canola oil
1 teaspoon vanilla
2 peaches, peeled and chopped
Crumble topping:
1/4 cup flour
1/4 cup brown sugar
2 tablespoons oats
2 tablespoons chopped pecans
1 teaspoon cinnamon
3 tablespoons butter
- Preheat oven to 375. Grease or line muffin tin.
- In a medium sized bowl stir together flour, baking powder, baking soda and salt. Set aside.
- Prepare crumble topping in a small bowl by combining dry ingredients and then crumbling butter into the mix with your fingers until everything is all crumbly. Set aside.
- In a large bowl, beat together sugar and eggs until pale and creamy. Add yogurt, oil and vanilla and mix well. Add flour mixture and stir until blended. Gently fold in blackberries until evenly distributed throughout batter.
- Add batter to prepared tin, filling them 3/4 full. Sprinkle topping on each muffin and bake until a toothpick inserted in the center comes out dry, about 20 minutes or so. Serve warm or at room temperature.

My notes: I used plain yogurt, because that's what I had. I added the pecans and omitted 1/4 teaspoon nutmeg from the crumble topping, I'm not crazy about nutmeg. And I had to MacGyver my oats. Realizing that I had used the last of them when I made another ELS recipe I reached for one of my husband's flavored instant oatmeal packets. I dumped it into a fine mesh sieve and sifted away all the powdery flavoring and it actually worked, ha. I certainly wouldn't suggest this option when you need a lot of oats, but for my 2 tablespoons it was a good solution. These muffins had a really great crumb, not too moist to where it stuck to the roof of your mouth, but not too dry either. Definitely making them again!
P.S. I served my muffins on the awesome platter I got from my Favorite Things swap partner Ginger. Thanks Ginger!
Tuesday, June 17, 2008
Graham Cracker Addict
My husband is a self-proclaimed graham cracker addict. Considering there are much worse things a person could be hooked on this doesn't really bother me. And although I would hardly consider store-bought graham crackers to be very expensive, we were buying them so often that I started to wonder if I couldn't just whip up our own. A lightening quick Google search lead me to a recipe on bakingsheet, which has long been transformed into Baking Bites. The recipe looked so simple that I decided I would definitely give it a shot. This is the second time I've tried this recipe and this was the closest I've gotten to what most people expect from a graham cracker. I think next time I make them they will be perfect. And now the kitchen is stocked for my hubby to grab a fix whenever he needs it. Guess I need to get around to trying one of those marshmallow recipes that have been so ubiquitous in the blogosphere as of late!
Homemade Graham Crackers
Recipe adapted from Retro Desserts by Bakingsheet; Appx. 48 crackers
1/2 cup all-purpose flour
1 3/4 cups whole-wheat flour
1/2 cup sugar
1 teaspoon baking powder
1/2 teaspoon baking soda
1/2 teaspoon salt
1/4 teaspoon ground cinnamon
1/2 cup cold butter, cut into 1/2 inch cubes
2 tablespoons honey
2 tablespoon molasses
1/4 cup cold water
1 teaspoon vanilla extract
- In a food processor, mix together the flours, sugar, baking powder, baking soda, salt, and cinnamon. Add the cold butter and process until the mixture resembles coarse meal, about 30 seconds or so. Add the honey, molasses, water, and vanilla. Mix until the dough startes to come together in a ball, another 30 seconds. Scrape dough out of the mixer.
- Between 2 sheets of waxed or parchment paper, roll the dough 1/8-inch thick. Chill for at least 1 hour, until firm (I chilled for several hours).Preheat oven to 350F. Retrieve dough and roll it a bit more if it is not yet 1/8-inch thick. With a sharp knife or pizza cutter, cut into 2-inch squares. Arrange the crackers on parchment lined baking sheets. With a toothpick, prick several holes in each cracker.
- Bake for 15 minutes, until lightly browned at the edges. Remove from the oven and let cool on the pan.
- Note: If you cut the dough through but leave the squares together, you can break them up after they're baked, just like a store-bought graham.
Monday, June 02, 2008
Kitchen Filler
Right now I've only got one pic of food ready to post, but I don't have the recipe with me. And lots of stuff on my camera waiting to be uploaded. So here's a little filler post until I can get my stuff together. :) A couple weeks ago, inspired by this post on Black Eiffel, I used my Friday off to clean out and tidy my kitchen pantry, refrigerator and freezer.
Pantry In my pantry I try to make the best use of the space that I have. On some shelves I make use of the space at the back that I wouldn't be able to reach easily by keeping extraneous items like my pewter salad bowl, popcorn popper, cookie cutter tin- things I need on rare occasions. Top shelf is carbs- rices, pastas, panko and breadcrumbs. Bottom shelf of the upper cabinet is canned goods- beans, various tomato products, tuna, peanut butter, a few canned veggies. There are three shelves in the lower cabinet. The top is baking supplies- white whole wheat, all purpose, and cake flour, cornmeal, vegetable and canola oil, two types of molasses, vinegar, and baking powder. All sorts of mix-ins tucked under that little riser too- chocolate and peanut butter chips, coconut, walnuts, pecans, and almonds. Middle shelf holds bread and crackers, and some oats in the back too. And the bottom shelf which isn't really visible holds our chips and cereal- typically tortilla, pretzels, and generic honey & oat clusters.
Freezer Not much to look at here- fruit bars, ice cream sandwiches (which no longer exist), eggplant bolognese in the plastic, pan of vegetable enchiladas, trout fillets from the pop-in-law, and a couple boxes of frozen junk food.
Refrigerator Well, this picture was taken before the weekend shopping trip, so it looks a lot more sparse than it normally is. What is normally in our fridge after a trip to the stores? A lot of cheese- shredded mozzarella and crumbled feta for pizzas, shredded cheddar, a block of cheddar, and a block of pepper jack. Those are pretty much always in there. Spinach, mixture of lettuces, celery, carrots, zucchini, squash, onions, and green bell peppers for salads, pizzas, and cooking. Apples and grapes, hummus and pitas, salted and unsalted butter, eggs, and our Brita water dispenser. No more cow's milk, unless I need it for baking. We've moved on to soy milk. The door is just chocked full of condiments- yellow, dijon and spicy-hot mustards, ketchup, preserves, salad dressings, Josh's coffee creamer, jars of olives, cherries, and minced garlic, wheat germ, and that weird powdery grated parmesan that Josh loves.
Friday, April 25, 2008
Chicken Sammiches
Recently I made one of Josh's favorite foods for dinner- a chicken sandwich. I know, is it weird that that is his favorite thing? That a chicken sandwich is what he will almost unfailingly order if it's on the menu? That it is his best and most ordered meal at our favorite seafood restaurant? Just give him some chicken on a bun and he's probably pretty happy. That said though, since he likes it so much I had always hesitated to make it. It's so simple, but I was sure that I could find a way to mess it up. But I went ahead and took a stab at it a week or two ago (don't even get me started on how little I've had to post lately). I used Kelly's Honey Mustard Chicken recipe to bake two chicken breasts. I spread a little bit of the extra sauce on the wheat buns (p.s. I found some awesome Orowheat buns with, like, 5 grams of fiber!), top with some tomato and greens, and there ya go! I made some more oven frites, cutting them a little thicker this time. They still came out great. Since I needed the oven at different temperatures for each recipe I cooked the chicken first, and covered it with foil while I cooked the fries and that worked great. Next time I will just split a chicken breast, or look a little harder for chicken cutlets, because it can be quite a mouthful with a whole breast.
Tuesday, April 15, 2008
Apple Crumb Coffee Cake
Last week I was taking a stroll over at Everybody Likes Sandwiches when I saw a delicious looking coffee cake. Now, she made the coffee cake in a bout of insomnia induced baking, and forgot to add the baking powder. The cake looked so good I was certain that I just had to make it. I decided to give it a shot Saturday afternoon, as a nice treat for all the spring cleaning I was doing. When gathering the ingredients I decided I would go ahead and give it a shot with the baking powder. It came out wonderfully, but I think I'm going to try it without the BP too, because her cake looks so wonderfully dense with apple. This cake gave me one of the nicest moments of the weekend- windows open, sun and breeze streaming in, hands messily mixing crumb topping while Prairie Home Companion seeped out of the speakers from NPR. It made me feel like I was doing something that my grandmother had surely done before me. So pleasant! Second nice moment- eating a piece of this cake!
Apple Crumb Coffee Cake
Recipe from Everybody Likes Sandwiches
for the cake part:
1 1/2 cups of flour
2 1/4 teaspoon baking powder
1/2 cup brown sugar
1/2 teaspoon salt
1/2 teaspoon cinnamon
1 egg
1/2 cup milk
1/4 cup canola oil
1 Granny Smith apple, chopped
for the crumb part:
1/2 cup brown sugar
1/4 cup flour
2 tablespoon unsalted butter
1/2 teaspoon cinnamon
1/4 cup chopped walnuts
- Preheat oven to 400. Butter and flour an 8" round cake pan, shaking off any excess flour. Prepare crumb topping in a medium-sized bowl, crumbling mixtures with your fingers until it looks like crumbs. Set aside.
- In a large bowl, mix together dry ingredients. In a smaller bowl, combine egg, milk and oil. Add the wet to the dry and mix. Add in apples and stir until combined. Pour batter into prepared pan and top with crumb mixture. Bake for 25-30 minutes or until a knife inserted in the center comes out clean. Let cool.

Thursday, April 10, 2008
What's Cooking?
I have indeed been cooking lately, but not much of it has been making it to the blog. I've been feeling a little less than inspired, despite the fact that Spring is more or less here, bringing with it lots of delicious goodies. I guess I've been feeling a little stale when it comes to what I'm posting here. So I turn to you, dear readers who occasionally pass through. What would you like to see when you stop by my little corner of the blogosphere? I would greatly appreciate the few seconds it takes to click the little buttons in the poll I made. Or, if you have suggestions that aren't in my poll, please do share them with me in the comments. I'm really thankful that even one person comes by here to share in my kitchen adventures with me, so if you can, help me make my corner an even nicer place to stop by.
Friday, March 14, 2008
More Yogurt Cake? Merci!
So, when I bought the yogurt I needed to make the Ina Garten yogurt cake, I ended up getting a big tub of it as I couldn't find any small containers at the store. Which left me with a lot of leftover yogurt. What should I do with it? Make another yogurt cake you say? I like your style. Because that is exactly what I did. This recipe comes from a wonderful book by Clotilde Dusoulier of Chocolate & Zucchini. Josh was kind enough to give me her Chocolate and Zucchini: Daily Adventures In A Parisian Kitchen as a Christmas gift. This was the first recipe I've made from it, but it won't be the last. I have so many pages tagged that I didn't know where to start, but having an excess of a key ingredient on hand helped me choose this cake. I'm planning on making this cake again this weekend to take over to the In-Law's for a Sunday afternoon lunch.
Yogurt Cake
Recipe from Chocolate & Zucchini
1/3 cup vegetable oil, plus 1 teaspoon to grease pan
1 cup plain unsweetened whole milk yogurt
1 cup sugar
2 large eggs
1 teaspoon vanilla extract
1 tablespoon light or amber rum (optional but recommended)
1 2/3 cups all-purpose flour
1 1/2 teaspoons baking powder
1 teaspoon baking soda
Good pinch of fine sea salt
- Preheat the oven to 350 degrees. Grease the sides of a 10-inch round cake pan or springform pan with oil and line the bottom with parchment paper if the pan is not springform.
- In a large mixing bowl, whisk together the yogurt and sugar. Add the eggs one by one, beating well after each addition. Add the vanilla, oil, and rum, if using, and whisk again.
- In another bowl, sift together the flour, baking powder, baking soda, and salt. Pour the flour mixture into the yogurt mixture, and whisk until just combined.
- Pour the batter into the prepared cake pan and bake for 35 to 40 minutes, until the top is golden brown and a knife inserted in the center comes out clean. Transfer the pan to a cooling rack and let stand for 10 minutes. Run a knife around the pan to loosen. If you're using the springform pan, unclasp the sides. Otherwise, flip the cake onto a plate and flip it back on the rack. Serve slightly warm or at room temperature.
Tuesday, March 04, 2008
Tomato Sauce with Onion and Butter
I had noticed this recipe before. It had wormed it's way into a back corner of my mind, and slept there, waiting for the day it would be awoken. And last week while I was planning my weekly menu, it finally arose. Molly mentioned it once again on her blog last week, which brought it to the forefront of my mind. I decided it would be perfect for this week, and as it turned out I picked the perfect night to make it. It was quite cold last night, and sleet came shining down most of the evening. This sauce was bright, but also very comforting. Josh is not always the biggest fan of sauce. He has been known to skip out on it completely and just coat is spaghetti with butter and Parmesan instead. But he seemed pleased to try this, and in fact had a second helping. Huzzah, a very simple and delicious sauce that my husband is happy to eat. In the future I would like to pull this recipe out for entertaining.
Tomato Sauce with Onion and Butter
Recipe from Orangette, adapted from Marcella Hazan; Makes 4 servings
2 cups whole, peeled, canned plum tomatoes, chopped, with their juices (about one 28-oz. can)
5 tablespoons unsalted butter
1 medium yellow onion, peeled and cut in half
Salt, to taste
- Combine the tomatoes, their juices, the butter, and the onion halves in a medium saucepan. Add a pinch or two of salt. Place over medium heat and bring to a simmer. Cook, uncovered, at a very slow but steady simmer, adjusting the heat as necessary, for about 45 minutes, or until droplets of fat float free from the tomato. Stir occasionally, mashing any large pieces of tomato with the back of a wooden spoon. Taste and salt as needed.
- Discard the onion before tossing the sauce with pasta.
Friday, January 04, 2008
Anniversary and New Resolutions
Well, it has officially been one year since I started posting on this blog. I did technically start it in September of '06, but then did nothing with it till I made it one of my 2007 resolutions to actually use it. And here we are! One year, over 100 posts, and lots of calories later. I posted yesterday on some of my favorite recipes over the past year, so no need to continue reminiscing. Let's look forward. Here are some of my food & blog related resolutions for the new year.
- Participate in more blog events. I can't remember the last blog event I took part in, which is a little sad. I need to get a little more involved in the community again. Not that I was ever totally immersed in it, but it does me some good to take on the challenge laid out by these events.
- Cross one thing off my to-cook list each month. I have a very long to-cook list. Some of the stuff on there has been on there for months and months. I need to make some of these things so that the list can continue to be refreshed, instead of just growing longer.
- Cook two recipes from each of my cookbooks. I don't have that many cookbooks, but I still have made very few recipes from the ones I do have. Over the next year I need to make at least two recipes from each cookbook. If I can't manage to do that then I need to rethink whether I even want the book on my shelf.
- Push myself to be more adventurous with ingredients. A lot of foods scare me. A lot. If I haven't had it before, chances are I'm afraid of cooking with it. I need to get over that and broaden my horizons. I know this place is called Small Time Cooks, but that doesn't mean I need to stick to all my biases.
- Explore vegan cooking and recipes. My friend LeAnn recently went vegan again. She had been vegan before, but then laxed and let me feed her some cheese. But she's back to enforcing the law and I like having her and Rob over for dinner, so I better figure out what I can feed her over the next year.
- Organize my kitchen and make it someplace I like to be. I do like my kitchen, but it's so darn tiny. It could use a little reorganizing. It could use some freshening up. And the cheaper I can do this, the better.
- Cook more over the weekends. Currently I cook through the week and take a bit of a break over the weekends. Cooking more through the whole week would help us save money and calories. And give me more fodder for this little space.
- Improve my food photography skills. Learning how to better use my new camera and more about photography is a resolution in general for me this year, but I want to extend that particularly into the area of food photography. I left a video shoot last weekend with several can lights, so I need to play around with them soon too.
- Explore the local farmer's markets. Besides the one in my father-in-law's backyard. But better utilize that one too. ;)